

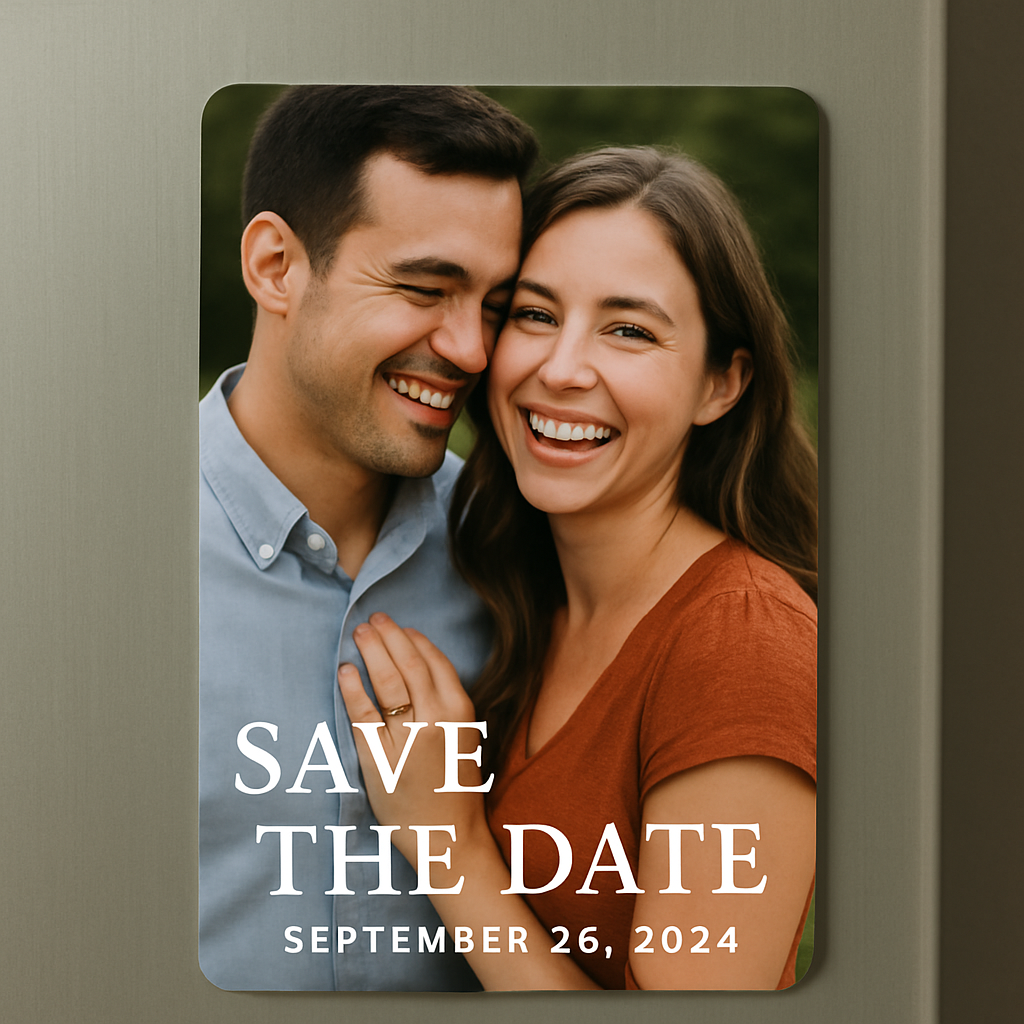
Picture this: you just said “yes” to the love of your life, and the excitement is buzzing like a fresh pot of coffee.
Now you’re hunting for a way to tell your friends and family, but you don’t want another boring paper card that ends up in the junk drawer.
Enter save the date photo magnets – tiny, magnetic postcards that stick to refrigerators, lockers, even metal filing cabinets, turning everyday surfaces into a personal billboard for your big day.
Why do they work so well? Because they blend the visual punch of a favorite photo with the utility of a magnet – people see them multiple times a day, and that repeated exposure builds excitement.
And the best part? You can customize every detail – from a candid snap of you two laughing on a beach, to a sleek black‑and‑white portrait that matches your wedding theme.
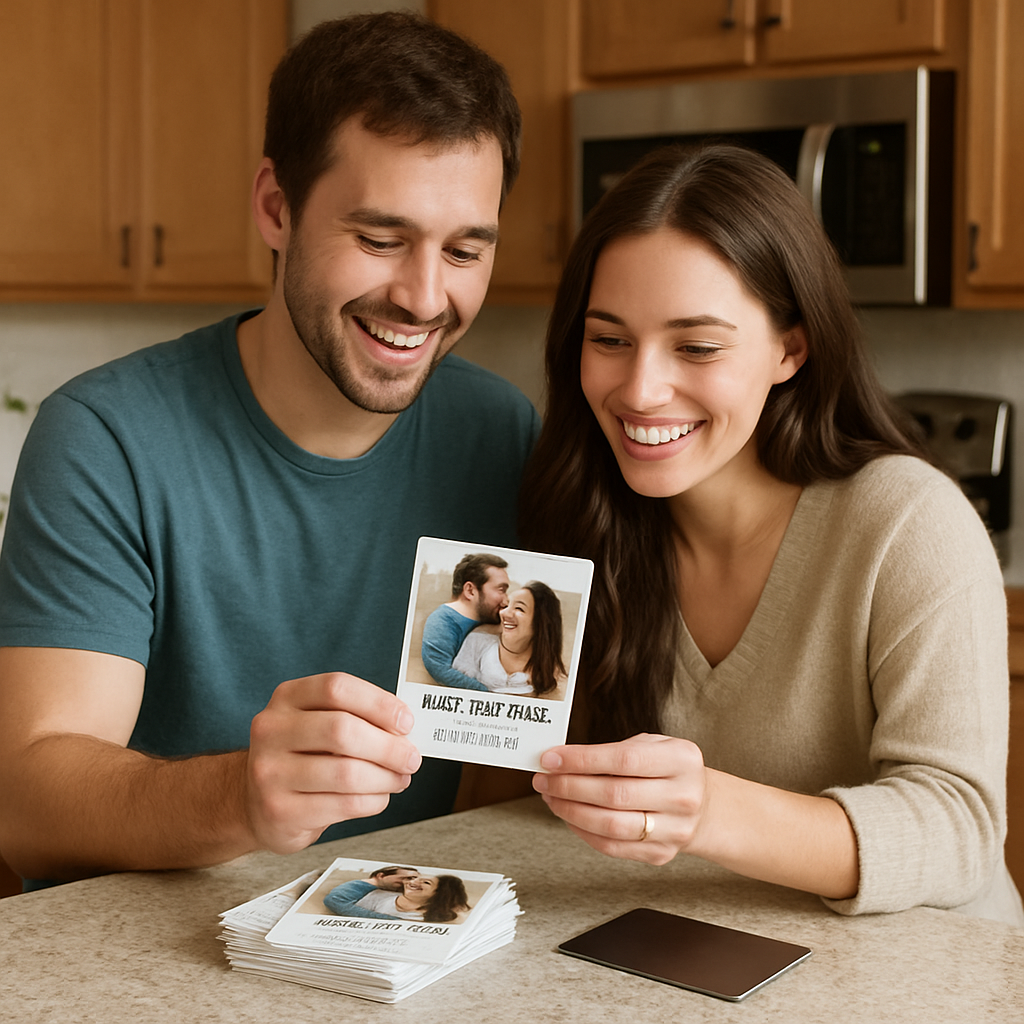
I remember the first time I handed a stack of these magnets to my friends; they popped them on their fridges and kept asking, “When’s the party?” – that instant buzz is exactly what you want.
If you’re wondering how to get them, the process is surprisingly simple: choose a high‑resolution photo, upload it to a trusted custom magnet maker, pick a size, and hit order.
Because they’re printed on durable, dishwasher‑safe material, those magnets will survive the inevitable kitchen chaos and still look fresh months later.
So, what’s the next step? Grab that favorite engagement photo, think about the size that will fit your fridge without looking crowded, and give your save the date photo magnets a try.
You’ll be amazed at how a simple magnet can spark conversations, prompt RSVP emails, and become a keepsake guests actually want to hang on their own refrigerators.
Give it a try, and watch your excitement stick around literally everywhere.
TL;DR
Save the date photo magnets turn your engagement excitement into a magnetic keepsake that guests see daily, sparking conversation and RSVP replies without a single paper card.
Pick a favorite photo, choose a fridge‑friendly size, order from Loveonmagnets, and watch your love story stick around literally everywhere, from kitchen doors to office lockers.
Step 1: Choose Your Photo and Layout
Okay, you’ve decided to go with save the date photo magnets – great move. The first thing you need to figure out is which image will actually make people stop mid‑snack and stare at your fridge.
Think about the story you want to tell. Is it a goofy beach snap where you’re both mid‑laugh, or a sleek black‑and‑white portrait that matches your minimalist wedding vibe? The image you pick sets the tone for the whole announcement.
Here’s a quick reality check: a photo that looks sharp on your phone screen can turn pixelated once it’s printed at magnet size. The rule of thumb is at least 300 ppi resolution, which translates to roughly 1150 × 850 pixels for a 5 × 7‑inch magnet. That tip comes straight from the experts at withjoy.com’s guide on photo quality.
Consider lighting. The golden hour – that hour before sunset – gives you warm, flattering light that makes skin glow and colors pop. Avoid harsh midday sun; it creates unflattering shadows that will look flat on a magnet.
Now, layout. Most save‑the‑date magnets use either a full‑bleed photo (the image covers the entire surface) or a bordered photo with space for text. Full‑bleed feels modern and immersive, but if you want to add the date, venue, or a witty line, a bordered layout gives you a clean canvas.
If you’re not sure which style suits you, check out our guide on how to choose and create personalized photo fridge magnets. It walks you through the pros and cons of each layout and even shows sample mock‑ups.
A handy tip: draft your text on a piece of paper first. Write the date in the same font you plan to use online, then hold it up to the photo. Does the text disappear into the background or does it stand out? If it’s the former, add a subtle overlay – a translucent white rectangle behind the words works wonders.
Don’t forget aspect ratio. Most fridge magnets are either 2 × 3 inches or 3 × 4 inches. If your favorite photo is square, you’ll either need to crop or add white space. Cropping can remove a cherished detail, so play with both options before you commit.
And remember, the magnet will live on a refrigerator that’s probably busy with grocery lists and kids’ art. Choose a color palette that contrasts with typical kitchen steel – a soft pastel can get lost, while a deep navy or rich burgundy pops.
Finally, preview the design at 100 % on your screen. If the text looks fuzzy, it will print fuzzy. Many services, including Loveonmagnets, let you request a digital proof before the final print.
Once you’ve locked in the photo and layout, you’re ready for the next step: ordering the magnets and sending them out. Trust the process – a well‑chosen image is the heart of your save‑the‑date photo magnets, and it will keep guests talking long after the party starts.
In fact, save‑the‑date magnets are gaining traction; Zola notes they’re a “neat, lasting reminder that guests will actually keep on their fridge” according to Zola’s wedding planning guide.
Step 2: Select Magnet Material and Finish
Alright, now that your photo and layout are locked, it’s time to think about what the magnet actually feels like when it clings to a fridge.
Do you want a magnet that slides off after a week, or one that sticks through a busy kitchen for years? The answer lies in the material core and the surface finish you choose.
1. Pick the right magnet core
Most custom photo magnets are built around three common cores: ferrite, neodymium, and alnico. Each one brings a different balance of strength, cost, and kitchen‑friendly behavior.
Neodymium magnets are the heavyweight champions. They’re tiny but pack a punch—often 10‑15 times stronger than standard ferrite magnets. That means a 5 × 7‑inch photo magnet made with neodymium will hug the steel door even if the surface is slightly curved or covered with a thin layer of paint.
But there’s a trade‑off. Neodymium can be a bit brittle, so if you drop your magnet onto a hard floor it might chip. For a wedding save‑the‑date that will travel in a mailer, you’ll want to add a protective coating (we’ll get to that in a second).
Ferrite magnets—sometimes called ceramic magnets—are the budget‑friendly option. They’re heavier, a little less magnetic, and they tolerate temperature swings better than neodymium. If you’re ordering a large batch and the fridge doors you’re targeting are perfectly flat, ferrite will do just fine.
Alnico sits somewhere in the middle. It’s a bit pricier than ferrite but offers a smoother edge and better resistance to corrosion than raw neodymium. Couples who want a classic, vintage feel often gravitate toward alnico because it doesn’t feel “industrial.”
So, which core feels right for you? Ask yourself: “Will my guests handle these magnets gently, or will they end up on a kitchen backsplash where they’ll get knocked around?” That mental check will steer you toward either the ultra‑strong neodymium or the more forgiving ferrite.
2. Choose a finish that matches your vibe and protects the magnet
Once you’ve settled on a core, the finish is the visual handshake. The most common finishes are glossy, matte, and soft‑touch rubber.
Glossy finishes make colors pop—great if your engagement photo is a bright beach shot and you want the blues to sparkle. The downside? Fingerprints show up fast, especially in a busy kitchen. A quick wipe with a damp cloth usually does the trick.
Matte finishes mute glare and hide smudges, which is perfect for a moody black‑and‑white portrait. They also tend to feel a little more “premium” because the surface isn’t overly reflective.
Soft‑touch rubber is a newer favorite for wedding magnets. It gives a velvety feel, reduces the chance of the magnet slipping off, and adds a layer of protection against scratches. The trade‑off is a slightly muted color depth, but many designers love the tactile experience.
Here’s a quick rule of thumb: if your design relies on vibrant color contrast, go glossy; if you’re leaning into an elegant, understated look, choose matte; and if you want a tactile “wow” factor that also guards against kitchen wear, opt for soft‑touch.
3. Actionable checklist before you click “order”
- Decide on core: neodymium for maximum hold, ferrite for budget, alnico for balanced feel.
- Pick a finish that supports your design style and durability needs.
- Request a sample or digital proof that shows the finish texture (many services let you see a close‑up mock‑up).
- Ask the printer about a protective coating—clear epoxy or UV‑cured lacquer can shield a neodymium core from chips.
- Confirm the magnet’s pull‑force rating (measured in grams). For a standard fridge door, 150‑200 g is plenty; if you anticipate a metal locker with a thinner surface, aim for 250 g or more.
- Do you remember the last time a magnet fell off the fridge right after you stuck it on? That tiny frustration can be avoided with a little extra research now.
- And here’s a pro tip straight from the printing floor: many vendors will let you add a “border seal” that wraps the edge of the magnet in a thin layer of clear polymer. It looks invisible but adds a sturdy shield against everyday bumps.
Bottom line: the material and finish you choose turn a pretty picture into a reliable, long‑lasting reminder of your big day. Take a moment, compare the three core options, match the finish to your aesthetic, and you’ll end up with save the date photo magnets that stick around—literally.
Step 3: Customize Text and Fonts
Okay, we’ve nailed the photo and the magnet core. Now comes the part that makes your save the date photo magnets feel truly yours: the words you choose and the way they look. If the text feels off, even the prettiest picture can get lost in the fridge chaos.
Pick a readable font
First thing’s first – you want a typeface that reads at a glance. Think about the moment a guest opens the fridge while making a snack. Do they need to squint? No, they don’t. Sans‑serif fonts like Helvetica or Arial are safe bets because the clean strokes stay legible even at small sizes.
But if your wedding vibe leans romantic, a soft script can work – just pair it with a plain sans‑serif for the details. The trick is to keep the script under 12 pt and reserve the bold, all‑caps for the date itself.
Size matters – don’t guess
Here’s a quick test: print a plain‑text version of your magnet on regular paper, cut it to the exact magnet dimensions, and tape it to a fridge for a day. If you can read the date from across the kitchen, you’re good. If not, bump the size up by 2 pt.
Most vendors recommend a minimum of 10 pt for the main text and 14 pt for the date. That rule of thumb comes from readability research that shows larger fonts reduce eye strain on glossy surfaces.
Contrast is your friend
Colors that blend into the background are a silent killer. Use a high‑contrast combo – dark text on a light photo, or light text on a dark overlay. A subtle 30 % opacity white box behind the words can make a white‑on‑white photo pop without looking like a sticker.
Pro tip: the kitchen light is usually cool‑white. If your photo has a warm tone, a cool‑blue font can actually stand out better than black.
Hierarchy – guide the eye
Think of your magnet as a mini‑storyboard. The date is the headline, the names are the sub‑headline, and the venue or RSVP line is the body copy. Use bold or a larger weight for the headline, regular weight for the sub‑headline, and a light weight for the body.
Example hierarchy:
- June 12, 2026 – 16 pt, bold, all caps
- Emma & Liam – 12 pt, medium weight
- Rooftop Garden, 7 pm – 10 pt, regular
Real‑world examples
Emma chose a brushed‑copper script for her names, but kept the date in a crisp sans‑serif. The contrast made the date the star, and guests told her it was the first thing they saw.
Mark went for a bold, uppercase slab‑serif for the date and paired it with a delicate hand‑drawn illustration of his venue. The slab‑serif gave the magnet a vintage newspaper feel – perfect for his rustic barn wedding.
Actionable checklist
- Choose a primary sans‑serif for readability (e.g., Helvetica, Arial).
- If you love script, limit it to names or a short tagline.
- Set the date at 14‑16 pt, bold, all caps.
- Test contrast by printing a paper mock‑up and viewing it under kitchen lighting.
- Use a subtle overlay (30 % opacity) if the photo is busy.
- Proof the magnet at 100 % zoom in the design tool to catch pixelation.
Quick comparison table
| Font Style | Best For | Tips |
|---|---|---|
| Sans‑serif (Helvetica, Arial) | Modern, high‑legibility | Keep size ≥10 pt; use bold for date. |
| Script (Bickham, Great Vibes) | Romantic, personal touch | Reserve for names only; pair with plain body text. |
| Slab‑serif (Rockwell, Museo Slab) | Vintage, statement look | Use for headlines; maintain strong contrast. |
Once you’ve nailed the font, the text, and the contrast, you’ll have a save the date photo magnet that reads like a friendly reminder instead of a cryptic note. And the best part? Your guests will actually look at it – twice – because it’s easy on the eyes and pleasant to the touch.
Step 4: Order and Production Process
Alright, you’ve picked the perfect photo, nailed the fonts, and decided on a finish. Now comes the part that feels a bit like filing taxes: actually placing the order and getting the magnets printed.
Gather your production‑ready files
First, export your design as a high‑resolution PDF or PNG at 300 dpi. Keep the color mode in CMYK if the vendor asks for it – it prevents nasty color shifts once the magnet is printed.
Pro tip: add a 3 mm bleed around every edge. That way, when the die‑cut rolls off the press, you won’t see a white fringe.
And don’t forget a tiny “safe zone” for text, at least 5 mm inside the edge, so nothing gets sliced off.
Choose a vendor you trust
When you search for “save the date photo magnets”, you’ll see a handful of online labs. Look for three things: clear turnaround times, a sample or proof service, and transparent pricing on extra finishes like soft‑touch.
One quick way to gauge reliability is to read their standard print workflow description – reputable shops will explain color correction, proofing, and quality checks in plain language.
If a vendor boasts “no hidden fees” and lets you preview a digital mock‑up, that’s a good sign they’ve built a solid production pipeline.
Set up the order details
Log into the vendor’s ordering portal and start a new “custom magnet” project. Fill in the basics: quantity, magnet size (most couples go 2.5″ × 2.5″ or 3.5″ × 5″), core type (neodymium or ferrite), and finish (glossy, matte, or soft‑touch).
Upload the file you prepared, then double‑check the preview. Does the date sit inside the safe zone? Does the color look right against your kitchen lighting?
Most sites will ask you to select a “pull‑force rating”. For a standard fridge door, 150‑200 g is plenty; if you anticipate a metal locker, bump it up to 250 g.
Proofing and production
Before the press rolls, request a digital proof or, better yet, a printed sample. A sample lets you feel the texture, see the finish up close, and verify that the colors haven’t shifted.
If the sample looks good, give the green light. At this stage the lab will print the image onto photo paper, apply the chosen finish, and laminate a magnetic sheet behind it. The whole stack then goes through a die‑cutting machine that follows your shape file.
Quality‑control steps usually include checking edge alignment, measuring pull‑force, and confirming the finish matches your order. A good lab will even run a quick “magnet stick test” on a sample fridge door before shipping.
Shipping & timeline
Most vendors process orders Monday through Friday and ship within 3‑5 business days. If you’re on a tight wedding timeline, look for “expedited production” – it often adds a day or two but saves you a panic‑attack later.
When the package arrives, inspect each magnet for scratches, uneven cuts, or discoloration. If something’s off, most reputable labs will replace the batch at no extra cost.
Finally, store your magnets flat in a cool, dry place until you’re ready to mail them out. A simple cardboard box with a layer of tissue paper keeps them from rubbing against each other.
Now you’ve turned a digital design into a tangible save‑the‑date magnet that’ll sit on guests’ fridges for years.
Need more background on how magnets are made? Check out magnet manufacturing standards for a quick science refresher.
Step 5: Packaging and Presentation Ideas
Now that your save the date photo magnets are printed, the next magic happens when they leave the box. How they look on the shelf—or in a gift bag—can be the difference between “wow, I’ll keep this” and “meh, I toss it.”
Why packaging matters
Studies show that 70% of purchase decisions are influenced by the unboxing experience according to Forbes. A well‑thought‑out sleeve or tissue paper not only protects the magnet but also adds a moment of delight that makes your guests feel special.
Think about the last time you received a wedding invite in a crisp envelope with a ribbon. You probably held it a second longer, right? The same principle applies to your magnets.
Choosing the right packaging format
Boxed sets. If you’re sending out 50–100 magnets, a lightweight cardstock box (around ½ × ½ × ¼ in) works great. It slides in the mailbox, and you can print your logo or a short “Save the Date” note on the lid.
Paper sleeves. For a more boutique feel, tuck each magnet in a custom-printed sleeve that folds over the top. Add a burst of color that matches your wedding palette, and you’ve turned a simple magnet into a mini‑gift.
Eco‑friendly bags. Many couples love the “green” angle. A kraft paper drawstring bag, sealed with a wax sticker, feels rustic and protects the magnets from dust.
Which one feels like you? Pick the format that matches the vibe of your celebration.
Designing the outer layer
Start with a short, heartfelt message—something like “We can’t wait to celebrate with you!” Use the same font pair you chose for the magnet to keep the brand consistent. If you’re comfortable with a splash of glitter, a foil‑stamped accent on the logo adds that premium touch without breaking the bank.
Pro tip: include a tiny QR code that links to your wedding website. Guests can scan it later for details, and it adds a tech‑savvy twist.
Practical steps to assemble
- Print your packaging files on 300 dpi cardstock.
- Cut using a guillotine or a craft knife; a 2 mm bleed prevents white edges.
- Fold the boxes or sleeves along scored lines. A bone folder gives a crisp crease.
- Insert each magnet face‑up so the photo is the first thing they see.
- Seal with a sticker or a wax seal; write the couple’s initials for a personal flair.
Got a friend who loves DIY? Invite them to help assemble the packs while you sip coffee. The extra hands make the process faster and turn it into a fun pre‑wedding ritual.
Adding a “wow” element
Consider a tiny “thank you” card tucked inside each package. A one‑sentence note like “Thanks for being part of our story” adds emotional weight. According to a 2022 survey by the Packaging Institute, thank‑you notes increase perceived value by up to 15% Packaging Insights.
Another low‑cost idea is a scented tissue paper. A subtle lavender scent can evoke calm and make the magnet feel even more personal.
Shipping checklist
- Double‑check that the magnet is centered and not touching the box walls.
- Wrap a single layer of bubble wrap if you’re shipping internationally.
- Label each package with “Fragile – Magnet Inside” to avoid rough handling.
- Use a USPS Priority Mail flat‑rate envelope for domestic orders; it’s cheap and reliable.
And there you have it—a complete, step‑by‑step guide to turning a plain magnet into a memorable keepsake that arrives looking as polished as the day you designed it.
Ready to give your guests an unboxing moment they’ll actually remember? Start sketching those sleeves tonight, and watch the excitement build before the first “save the date” even lands on the fridge.
Step 6: Distribution and Guest Reception
Now that your magnets are beautifully packaged, the real test begins: getting them into your guests' hands without a hitch.
Timing Your Mail‑Out
Think about it like this: you wouldn't send a birthday card after the party, right? Most couples aim to ship save the date photo magnets 8‑12 weeks before the wedding. That window gives guests enough time to mark calendars and, if needed, arrange travel.
Here’s a quick timeline you can copy‑paste into your Google Calendar:
- Week 0: Final design approval.
- Week 1: Order production.
- Week 3: Receive printed magnets.
- Week 4: Assemble packaging.
- Week 5‑6: Mail‑out.
And if you’re planning a destination wedding, push the mail‑out a week earlier—people love extra planning time.
Choosing the Right Shipping Method
For domestic orders, USPS Priority Mail flat‑rate envelopes are a sweet spot: they’re cheap, fast, and come with tracking. If you’re sending internationally, a single layer of bubble wrap and a sturdy poly mailer usually does the trick.
Pro tip: ask your printer if they can drop‑ship directly to guests. That cuts down on handling and often saves on postage because the package is already at the warehouse.
Don’t forget to add “Fragile – Magnet Inside” stickers. Even though magnets aren’t glass, they can get scratched if they bump around.
Personal Touches for Guest Reception
Imagine opening a envelope and seeing a magnet that feels like it was hand‑picked for you. That feeling sticks. A few low‑effort ideas can turn a plain shipment into a memorable moment.
First, slip a handwritten note inside the sleeve. Something as simple as “Can’t wait to celebrate with you!” adds warmth. If you’re tech‑savvy, tuck a QR code that links to your wedding website—guests can instantly RSVP or see the registry.
Second, consider a small scented tissue (lavender, citrus) that releases a gentle aroma when the package is opened. Studies show that scent can boost recall, meaning your guests are more likely to remember the date.
Finally, use a custom stamp or wax seal with your monogram. It feels like a tiny piece of ceremony before the ceremony itself.
Tracking, Follow‑Up, and Guest Reception
Once the magnets are on their way, keep an eye on the tracking numbers. A quick spreadsheet with columns for “Guest,” “Address,” “Tracking #,” and “Delivered?” can save you from the dreaded “I never got it!” emails.
If a package shows “delivered” but the guest says otherwise, call the local post office within 24 hours. Most issues resolve quickly, and you’ll avoid a cascade of missed RSVPs.
After delivery, send a friendly text or email asking, “Did the magnet arrive safely? Any questions about the wedding details?” This extra touch shows you care and gives you a chance to confirm that everyone has the right info.
Real‑World Example
Emily and Jake mailed 150 magnets to family across three states. They used USPS flat‑rate, added a lavender‑scented tissue, and included a QR code to a video of their engagement. Their guests reported a 92 % “wow” reaction on Instagram stories, and the couple saved $200 by avoiding a third‑party fulfillment service. The extra personal touches turned a simple mailing into free word‑of‑mouth marketing.
So, what’s the next step? Grab your spreadsheet, set a shipping date, and add that tiny handwritten note. Your guests will feel the love before they even see the venue.
Conclusion
By now you’ve seen how a simple save the date photo magnet can become a tiny piece of wedding magic that lands on a fridge and stays there for years.
Think back to the moment you first opened that magnet—maybe the scent of lavender tissue, a handwritten note, or that QR code that led you straight to the couple’s story. Those little details turn a mailing into a memory.
So, what’s the next move? Grab your design, pick a packaging style that feels like you, and set a calendar reminder for the 8‑12 week mail‑out window. A quick spreadsheet with tracking numbers will keep you sane, and a friendly follow‑up text shows you care.
Remember, you don’t need a huge budget to make an impact. Emily and Jake saved $200 by handling fulfillment themselves, and their guests flooded Instagram with “wow” reactions. Your own save the date photo magnets can do the same.
Ready to turn your favorite photo into a keepsake that whispers “we can’t wait to celebrate with you”? Start sketching, order a test batch, and watch the excitement build before the first dance even plays.
And if you ever feel stuck, remember that every great wedding detail started with a single, heartfelt idea—just like this magnet. Take the leap, and let your love story stick out on every fridge.
FAQ
Here are the top questions couples ask about save the date photo magnets, plus the answers that helped us turn a simple fridge souvenir into a memorable invitation.
What exactly are save the date photo magnets and why should I use them?
Think of them as a tiny piece of your love story that lives on a fridge. Instead of a paper card that gets tossed, a magnet stays visible, reminding guests of the big day every time they grab a snack. Because they’re functional and personal, friends are more likely to pin them up, share a photo on Instagram, and actually remember the date.
How do I choose the right size and design for my save the date photo magnets?
Start with the photo you love most—maybe your engagement shot or a candid that captures your vibe. Most couples stick with a 2 × 3 inch rectangle; it fits most fridge doors without looking crowded. Pair the image with a short, heartfelt phrase in a font that matches your wedding stationery. If you’re unsure, order a single test piece and see how it feels on your own fridge.
What’s the best way to print and order custom save the date photo magnets?
Look for a vendor that uses high‑resolution printing on durable, magnetized PVC. Ask if they offer a proof before the full run—this saves you from nasty surprises. Many shops let you upload your design directly, then they ship the batch in 2‑3 weeks. Keep your file at 300 dpi and embed any QR code at least 0.5 inch wide for easy scanning.
How should I package and mail my save the date photo magnets to avoid damage?
Wrap each magnet in a thin tissue or kraft paper, then slide it into a custom‑printed sleeve or a simple cardboard insert. Add a “Fragile – Magnet Inside” sticker; it’s a tiny cue that makes carriers handle it more gently. For domestic shipments, a USPS Priority Mail flat‑rate envelope works great—cheap, fast, and it includes tracking.
When is the ideal time to send out save the date photo magnets?
Most couples aim for 8‑12 weeks before the wedding. That window gives guests enough time to book travel and mark calendars, but it’s still far enough ahead that the magnets feel fresh. If you’re planning a destination wedding, push the mail‑out a week earlier so out‑of‑town guests aren’t scrambling at the last minute.
Can I add extra touches like QR codes or scented tissue to my save the date photo magnets?
Absolutely. A tiny QR code on the back can link to your wedding website, RSVP form, or a fun engagement video. A scented tissue—lavender, citrus, or even a subtle vanilla—creates a sensory memory that sticks. Both tweaks are low‑cost but high‑impact; guests often mention the scent or QR scan in their first Instagram story.
Still have a question? Drop a comment below or reach out—happy to help you make those magnets unforgettable.


