

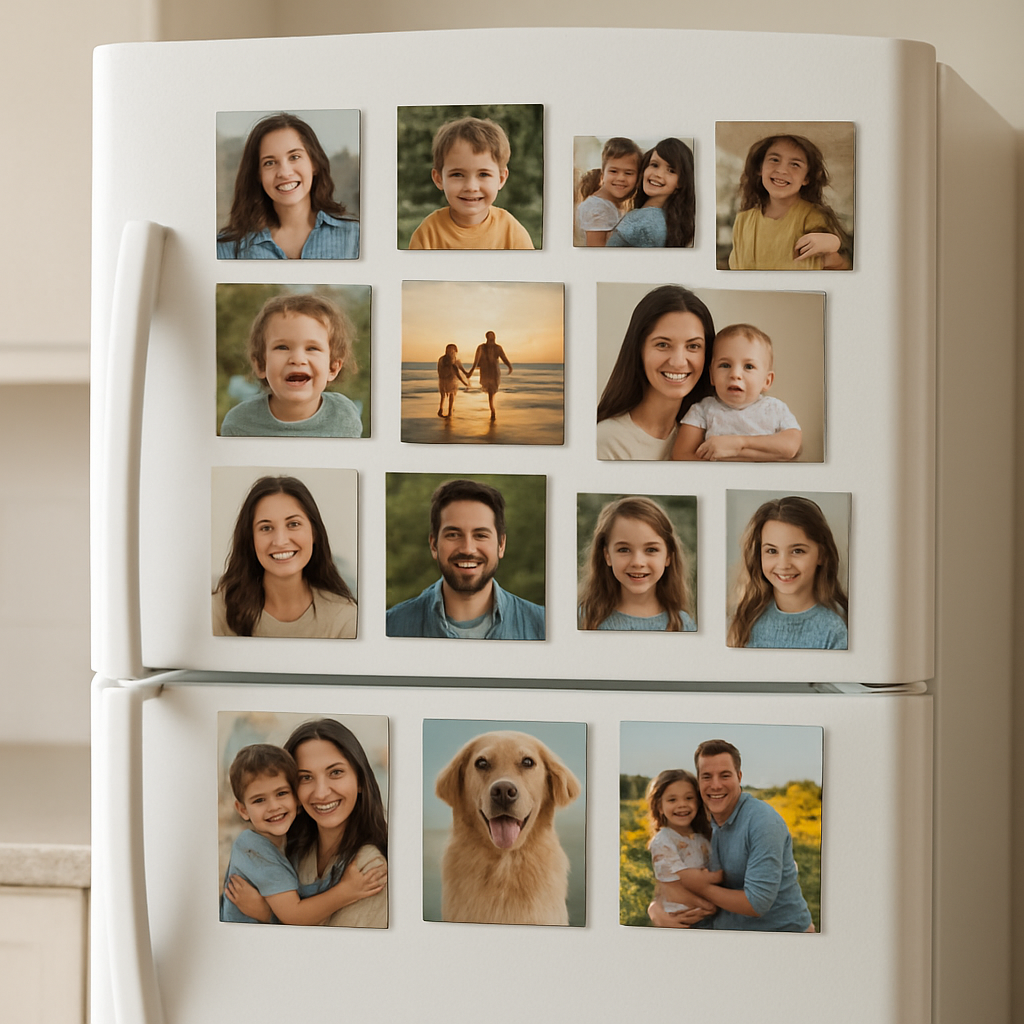
Ever walked into your kitchen and felt that sudden pang of nostalgia when a favorite photo pops up on the fridge, but it’s just stuck with tape that’s already peeled off?
We’ve all been there – the picture looks great on the wall, yet the adhesive betrays us, leaving a sticky mess and a ruined memory. That’s why magnetic photo tiles feel like a little miracle.
Imagine a sleek, lightweight tile that clings to any metal surface, lets you swap images in seconds, and never leaves a residue. That’s the magic of magnetic photo tiles, and it’s why they’re quickly becoming the go‑to décor hack for families, renters, and creative souls alike.
But why settle for a single 4×6 print when you can create a gallery wall that’s as fluid as your mood? With magnetic tiles you can mix sizes, play with patterns, and rearrange on the fly – kind of like a visual playlist for your home.
Think about the last time you wanted to showcase a vacation snap, a kid’s art masterpiece, or a motivational quote. Instead of hunting for a new frame or worrying about nails, you just slide the tile onto the fridge, locker, or even a metal cabinet, and you’re done.
And if you’re a renter, you’ll love that you can take the whole display with you when you move, no holes, no damage, just a handful of magnets that pack up in a tiny box.
So, what’s the secret sauce that makes these tiles stick? It’s a combination of strong neodymium magnets laminated behind a printable surface, giving you a vibrant photo that adheres securely without warping.
Now, you might wonder about durability. Rest assured, most magnetic photo tiles are coated to resist water splashes, kitchen fumes, and the occasional accidental bump.
Here’s a quick mental picture: you’re cooking dinner, the timer dings, you glance at the fridge and see that goofy dog photo you printed last week, right there, bright and intact, cheering you on.
Sound familiar? That little boost of joy is exactly why people are swapping traditional frames for magnetic photo tiles.
Ready to turn your fridge into a rotating museum of moments? Let’s dive in and explore how you can pick the right size, design your own tiles, and make swapping as effortless as changing a song on a playlist.
TL;DR
Magnetic photo tiles let you instantly showcase vibrant memories on any metal surface without nails, tape, or damage, turning everyday spaces into personal galleries. Swap, move, or redesign your fridge gallery in seconds, keeping your space fresh and your moments truly portable, and you’ll never worry about messy adhesives again.
Step 1: Choosing the Right Magnetic Photo Tiles
Alright, before you start plastering memories on every metal surface you see, you’ve got to pick the tile that actually works for your space. It’s easy to get swept up by the cute designs, but the right size, material, and magnet strength will keep your gallery looking sharp and staying put.
Size matters more than you think
Think about where you’ll hang the first tile. A 2×2 inch square is perfect for a quick coffee‑shop selfie, while a 4×6 rectangle can showcase a family portrait without looking cramped. If you plan a collage, mix a few sizes – it adds visual rhythm, kind of like a playlist where each song has its own vibe.
Pro tip: measure the available metal area first. You don’t want a tile that overflows the fridge door and looks like a toddler’s art project gone rogue. Write down the dimensions, then match them to the tile options you’re eyeing.
Material and finish – what feels right?
Most magnetic photo tiles are printed on a glossy, vinyl‑coated surface that resists kitchen splashes and fingerprints. If you love the look of matte, many vendors now offer a satin finish that reduces glare under fluorescent lights.
Consider the room’s lighting. In a bright kitchen, a matte finish keeps the colors true, whereas a glossy tile can make a dim hallway pop with a little extra shine.
Magnet strength – don’t underestimate it
Neodymium magnets are the powerhouse behind these tiles. They’re strong enough to hold a photo on a fridge door, but not so strong that you can’t peel them off without a tug‑of‑war. Look for tiles that mention “medium‑hold” if you have a light‑weight door, or “heavy‑hold” for steel cabinets that tend to flex.
If you’re still unsure, test a single tile on the surface you plan to use. A quick “do you feel it pull back?” check will tell you if it’s snug or slipping.
Design tips that make a difference
When you choose the image, pick high‑resolution photos (300 dpi or more) so the tile doesn’t look pixelated when you get up close. And don’t forget the border – a thin white or black frame can give the photo a finished look, especially on a busy fridge.
Want a cohesive theme? Stick to a color palette that matches your kitchen décor. For example, if you have teal appliances, a series of teal‑tinted borders will tie everything together without shouting.
Now, let’s see a quick demo of how you can size and attach the tiles in real time.
Notice how the presenter swaps a 3×3 tile for a 4×6 tile in seconds – that’s the kind of fluidity we’re after. The key is keeping a small toolbox of magnets nearby so you can adjust the grip on the fly.
One last thing: if you’re looking for inspiration beyond the kitchen, check out the creative community at Midnight Scriber. They share dozens of real‑world setups that might spark your own DIY layout.
To sum it up, pick the right size, match the finish to your lighting, test magnet strength, and choose images that complement your décor. Once you’ve nailed these basics, the rest of the process – designing, printing, and swapping – becomes a breeze.
Step 2: Preparing Your Wall Surface
Before you start sliding magnetic photo tiles onto any surface, you’ve got to make sure that surface is ready to hold them. Think of it like laying down a fresh rug – if the floor is dusty or uneven, the rug will shift, and you’ll end up with a lopsided look.
1️⃣ Clean the area, don’t just “wipe it down”
Grab a soft cloth, a mild dish‑soap solution, and give the spot a gentle scrub. Avoid harsh chemicals; they can leave residues that dull the magnet’s grip. Once it’s clean, dry it with a lint‑free towel. If you’re working on a stainless‑steel fridge, a quick pass with a vinegar‑water mix does wonders.
Pro tip: after cleaning, run your hand over the surface. If it feels tacky, give it another wipe. A truly clean surface is the foundation of a long‑lasting tile display.
2️⃣ Test the magnetic pull
Take a small, cheap refrigerator magnet and press it where you plan to place a tile. Does it stick firm or slide off after a second? If it slides, you have two options: either switch to a smoother spot or boost the magnetic strength with a backing plate.
In a busy kitchen, many homeowners opt for a thin metal sheet (often called a “magnet board”) that you mount with removable adhesive strips. This gives you a perfectly flat, high‑magnetism surface without drilling holes.
3️⃣ Address textured or uneven walls
Brick, reclaimed wood, or a textured drywall can be a nightmare for magnets. The gaps prevent full contact, so the tiles will wobble or fall. Here’s what you can do:
- Apply a smooth, peel‑and‑stick metal sheet over the area. It’s cheap, removable, and works like a dream.
- Alternatively, use the Magnofix® adhesive‑magnet system that comes with many magnetic photo tiles – the adhesive fills in the tiny gaps, giving a secure bond.
One real‑world example: a family in Portland turned a rough‑finished pantry door into a gallery by first attaching a 1‑mm steel panel with 3M Command strips, then layering their favorite vacation tiles on top.
4️⃣ Prime for moisture‑prone zones
Bathrooms and kitchens are humid, and that humidity can weaken the magnetic hold over time. A quick spray of clear, water‑based sealant (think “crate‑seal”) on the wall before you attach the metal sheet adds a protective barrier.
According to CanvasDiscount’s product notes, their MIXPIX® tiles are already coated to resist splashes, but a sealed wall gives you double the peace of mind.
5️⃣ Create a layout checklist
Grab a piece of masking tape and outline where each tile will go. This visual “mock‑up” helps you avoid trial‑and‑error later. If you’re going for a grid, measure the distance between tiles (usually 1‑2 inches) and mark it.
Here’s a quick checklist you can print:
- Surface clean and dry?
- Magnet test passed?
- Flat metal backing installed (if needed)?
- Sealant applied for wet areas?
- Layout taped out?
Cross each item off, and you’ll feel confident when the first tile clicks into place.
6️⃣ Real‑world scenarios
Home office wall: A user with a painted drywall panel first applied a thin aluminum sheet with adhesive, then arranged 8" × 8" tiles of project milestones. The tiles stay put even when the door swings.
Kids’ playroom cabinet: The family used a magnetic paint (a primer mixed with iron particles) on the cabinet doors. After it dried, the magnetic photo tiles adhered without any extra hardware – perfect for little hands to rearrange.
Farmhouse kitchen makeover: After installing a reclaimed wood backsplash, the homeowner added a stainless‑steel strip behind the tiles, then layered a mix of recipe cards and family photos. The result was a functional, ever‑changing art piece.
If you’re curious about the broader world of photo magnets, you can learn more about photo magnets and how they’re made in our full guide.
Finally, remember that a well‑prepared surface not only keeps your magnetic photo tiles looking crisp but also protects your walls from accidental damage – a win‑win for renters and homeowners alike.
Need extra inspiration for the surrounding décor? Check out this area rug size guide for tips on balancing floor pieces with wall art, or explore a farmhouse kitchen renovations guide to see how magnetic tiles fit into larger remodel projects.
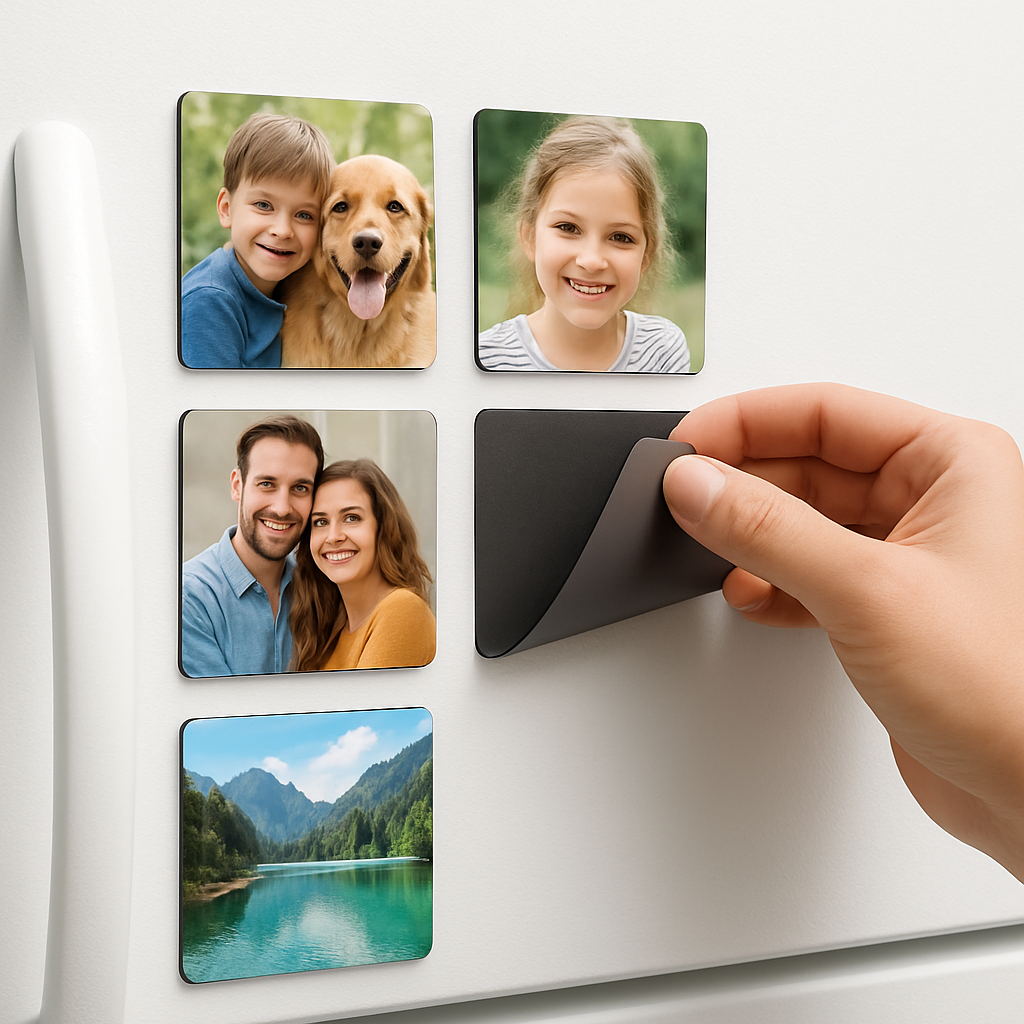
Step 3: Installing Magnetic Photo Tiles
Now that your surface is prepped, it’s time to actually put those magnetic photo tiles up. You’ve already cleaned, tested the pull and even taped a mock‑up, so the rest should feel almost too easy.
And here’s the secret: magnetic photo tiles stick because the magnet is hidden in the back, not because you’re using glue. That means you can press, step back, and watch the tile cling like it was meant to be there.
Gather Your Materials
Grab the tile pack, a level (the tiny one that came with Snaptiles works fine), and a soft cloth. If you ordered a starter kit, you’ll also have a thin metal mounting strip – think of it as the invisible rail that helps the first tile stay level.
Mark Your Layout
Before you smash anything, lay the tiles on the floor in the order you want. Take a photo of that arrangement – it’s a lifesaver when you get to the wall and the fridge door swings shut. Then, using a pencil or removable masking tape, lightly trace the outer edges on the surface. Keep the spacing about an inch apart unless you’re going for a tight collage.
Snap the Anchor Tile
Pick the tile you want to be the anchor – usually the biggest or the one with the most visual weight. Peel off the protective backing (if there is one) and press the magnetic side firmly against the marked spot. You’ll feel a satisfying “click” as the magnet finds its grip. Use the level to make sure it’s perfectly straight; a quick tap with your fingertip can nudify it without losing adhesion.
Add the Rest
Now the fun part: grab the next tile and let the magnets do the work. Simply line it up next to the anchor and let the edges snap together. Because the magnets are neodymium, they’ll hold even if the fridge door opens and closes. If a tile feels a little loose, give it an extra half‑second press – the magnetic field needs that moment to settle.
If you’re covering a larger area, work outward from the center. This prevents a “drift” where the whole cluster slides toward the fridge’s edge. And don’t worry about gaps; a tiny space between tiles adds visual breathing room, making each photo pop.
Check Alignment and Secure
Step back and eyeball the whole composition. Does anything look crooked? If so, just lift the tile – the magnet releases easily – and reposition. For high‑traffic zones like a kitchen, you can reinforce the bottom edge with a thin strip of self‑adhesive metal; it’s invisible but gives the magnets extra backing.
Maintenance Tips
A quick wipe with a dry microfiber cloth keeps fingerprints at bay. Because most magnetic photo tiles have a UV‑protective coating, you won’t notice fading even if the sun hits the fridge for hours. If you ever need to move the whole display, simply pull the tiles off in one smooth motion – they come off clean, no residue.
And here’s a pro‑level trick: swap a tile with a new photo whenever you feel the vibe changing. Because the magnets never lose their bite, you can refresh your gallery as often as you change your coffee mug.
Snaptiles, a brand of magnetic photo tiles, are praised for their lightweight SBS paperboard and UV‑protective laminationaccording to a detailed review.
That’s it – install, admire, and keep swapping. In just a few minutes you’ve turned a bland metal door into a living memory board that stays put, looks great, and won’t damage the surface when you move.
Step 4: Customizing Layouts and Designs
Start with a visual story
Before you even touch a tile, picture the vibe you want. Is it a calm beach‑sunset collage that makes you sigh, or a bold grid of recipe cards that fuels the dinner rush? When you know the feeling, the layout becomes a natural extension of that mood rather than a forced design.
So, what should you do next? Grab a sheet of paper, sketch a quick mock‑up, and give each tile a placeholder label – “vacation‑1”, “kids‑art”, “quote‑3”. This tiny exercise saves you from a half‑finished wall that looks like a jigsaw puzzle gone rogue.
Pick a layout language
- Grid. Perfect for uniform tiles (e.g., 8×8 in). Keeps the eye moving in neat rows and columns. Ideal for a modern kitchen or a home‑office gallery.
- Salon‑style collage. Mix sizes, let edges bleed into each other, and let the composition feel spontaneous. Works great in a family room where kids’ artwork and travel snaps mingle.
- Linear strip. A single‑row runway for weekly menus, inspirational quotes, or a timeline of milestones. Think of a fridge‑door runway you can glance at while grabbing coffee.
Real‑world example: A Portland family used a 3‑column grid for family photos, then slipped a 4×4 in “grocery list” tile in the middle row. The grid stayed tidy, but the list added daily utility.
Play with color, borders, and orientation
Magnetic photo tiles let you experiment without committing to paint or frames. Try a monochrome theme for a sleek look, or go full‑color for a vibrant mood board. If you love a little drama, rotate a few tiles 90° for an intentional “off‑beat” feel.
Pro tip: Use matte‑finish tiles in high‑traffic zones (like the kitchen) to hide fingerprints, then swap in glossy pieces for a showcase wall where you want the colors to pop. TilePix’s Stick&Slide system makes swapping a breeze – just peel, stick, and slide to a new spot according to TilePix’s own guide.
Blend function with flair
Why not let a tile do double duty? Print a weekly menu on an 8×8 tile, then pair it with a magnetic calendar tile from the same set. When the month flips, you just swap the calendar tile – no need for extra paper.
Another fun idea: Turn a favorite quote into a tile and place it next to a “to‑do” tile made from a simple checklist graphic. The magnetic backing lets you rearrange the order whenever priorities shift.
Mind the spacing
We often think “the tighter the better,” but a little breathing room lets each photo breathe. Aim for 1‑2 in gaps for a grid; for a collage, let the gaps be irregular – it adds visual rhythm.
Here’s a quick checklist you can print and tape to the wall before the first press:
- Did I mark the outer perimeter?
- Are my gaps 1‑2 in (or intentionally uneven for a collage)?
- Do I have a mix of sizes for visual hierarchy?
- Is there at least one functional tile (menu, calendar, list)?
Pro‑level customization tricks
1️⃣ Layering. Place a thin, transparent magnetic sheet behind a group of tiles to create a “floating” effect. The sheet adds extra pull for heavy tiles and lets you treat the whole cluster as one piece when you need to move it.
2️⃣ Border accents. Use a magnetic strip with a contrasting color (black, gold, wood‑tone) as a thin frame around a set of tiles. It instantly upgrades a casual collage into a gallery‑ready display.
3️⃣ Seasonal swaps. Keep a small stash of themed tiles (spring florals, holiday icons) stored in a drawer. When the season changes, pull out the new set and slide them in – the whole room feels refreshed without a single nail.
4️⃣ Kids‑approved zones. Designate a low‑height magnetic panel in a playroom. Let the kids print their own mini‑tiles and rearrange them anytime. The magnets hold firm, and the wall stays damage‑free.
CreateOn notes that their magnetic tiles are great for open‑ended play and can be combined with other design tools, which is perfect for families looking to blend décor and learning as highlighted by CreateOn’s product page.
Final quick‑run layout cheat‑sheet
| Layout Type | Best‑Fit Tile Size | Typical Use‑Case |
|---|---|---|
| Grid | Uniform 8×8 in or 4×4 in | Modern kitchen, home office gallery |
| Salon‑style collage | Mix of 2×2, 4×4, 8×8 in | Family room, kids’ art wall |
| Linear strip | Long rectangular 8×4 in | Weekly menu, inspirational quote row |
Give it a try tonight: pull out your phone, snap a quick photo of the space, draft a tiny layout on paper, then start sliding tiles until the story feels right. Remember, with magnetic photo tiles you can always hit “undo” – just lift, flip, and try again. Happy designing!
Step 5: Maintaining and Removing Tiles
Alright, you’ve spent some time curating that perfect magnetic photo tiles gallery—maybe a beach shot next to a grocery list, maybe a kids’ doodle beside a recipe. Now comes the part most people skip: caring for those tiles so they keep looking fresh, and knowing exactly how to pull them down without a drama.
Why maintenance matters
Ever notice a fingerprint on a glossy tile that looks like a tiny smudge? Or a tile that’s started to wobble because the magnet lost a little bite? Those little annoyances add up, especially in high‑traffic spots like the kitchen. A quick routine keeps the visual vibe sharp and prevents the magnets from losing their grip.
Step‑by‑step cleaning routine
1️⃣ Dust before you wipe. Grab a soft, lint‑free cloth and give each tile a gentle swipe. Dust particles are like sand in a hinge; they can dull the magnetic surface over time.
2️⃣ Spot‑clean with a barely‑damp microfiber. For fingerprints or splashes, lightly dampen the cloth with water (or a mix of water and a drop of mild dish soap). Avoid harsh chemicals—they can leave residue that weakens the magnet’s pull.
3️⃣ Dry it right away. A quick pat with a dry cloth prevents water spots, especially on the glossy‑finish tiles.
4️⃣ Check the magnetic pad. Every few weeks, pull a tile off and give the backing a once‑over. If you see dust or a thin film, a quick wipe with the same damp cloth does the trick.
5️⃣ Rotate tiles regularly. Swapping a tile every month gives the magnets a chance to reset their grip and keeps the display feeling new.
Real‑world example: The busy family kitchen
Take the Martinez family from Portland. Their fridge holds a rotating set of recipe cards, a vacation photo, and a weekly menu tile. They’ve adopted a “Friday‑night reset” where they wipe each tile while the kids help stick a new doodle on the side. The routine takes five minutes, but the kids love the ritual and the magnets stay solid through the weekend rush.
Removing tiles without a hiccup
When it’s time to move, redecorate, or just take a break from the wall, the process is as simple as the install. Because TilePix uses a removable magnetic wall pad, you can lift the tile straight off—no tugging, no residue.
• Grip the edge. Use your thumb and forefinger to lift from a corner. The magnet releases with a light pop.
• Detach the wall pad if needed. If you plan to relocate the whole set, peel the pad off the wall. The pad itself is designed to stick again elsewhere.
• Store safely. Slip the tile into a small envelope or the original packaging. If you’re moving houses, pack the pads together with the tiles—they’ll stay flat and protected.
What if you’re dealing with a textured wall? TilePix recommends a single thumbtack through the wall pad’s top nick to anchor it permanently on uneven surfaces. Once the pad is secure, the tiles still pop off easily, giving you the best of both worlds—stability for the wall, flexibility for the art according to TilePix’s peel, stick, and fine‑tune system.
Pro tips for longevity
- Keep the surrounding surface clean; oil from hands can transfer to the magnet.
- Avoid direct sunlight for more than a few hours a day; UV can fade prints over months.
- Use the optional magnetic strip border (available from TilePix) to add extra pull for larger 8×8 tiles.
- When you notice a tile slipping, re‑press it for a full second—magnetic fields need that moment to settle.
And if you ever wonder whether the magnetic pad itself can be reused, the answer is a resounding yes. Meijer Photo notes that the pads are removable and can be repositioned on any clean, dry surface, giving you the freedom to move a whole gallery without drilling or damaging the wall as explained by Meijer Photo’s magnetic wall pad guidance.
Quick maintenance checklist
□ Dust tiles weekly
□ Spot‑clean fingerprints as they appear
□ Inspect magnetic pad for debris
□ Rotate at least one tile monthly
□ Store removed tiles in a protective sleeve
Following these steps means your magnetic photo tiles will stay vibrant, securely attached, and ready for the next creative burst—whether that’s a new holiday snap or a spontaneous doodle from the kids.
Conclusion
After walking through picking, prepping, installing, and caring for magnetic photo tiles, you’ve seen how easy it is to turn any metal surface into a living memory board.
Think about the last time you wanted to showcase a new vacation snap – instead of hunting for a frame, you just slide the tile onto the fridge and it sticks like it was meant to be there.
What’s the biggest win? Flexibility. You can rearrange, swap, or completely pull the gallery down without a single nail or sticky residue.
Key takeaways
- Choose the right size and magnet strength for your surface.
- Clean and test the area before the first press.
- Use the quick‑check checklist to keep tiles bright and secure.
- Remember the pad is reusable – you can move the whole display whenever you like.
So, what’s next? Grab a favorite photo, order a custom magnetic photo tile, and give your kitchen, office, or hallway a splash of personality today.
And if you ever feel stuck, just revisit the steps – a few seconds, a light press, and you’re back to swapping memories like playlists.
Keep this guide handy, and remember that magnetic photo tiles aren’t just décor—they’re a quick way to celebrate moments, big or small, every day. Happy decorating!
FAQ
What are magnetic photo tiles and how do they work?
Think of them as tiny, high‑tech postcards that stick to metal. A thin neodymium magnet sits behind a printable surface, so when you press the tile onto a fridge or steel cabinet it snaps into place without any glue.
It’s as simple as sliding a photo onto a fridge door and feeling that satisfying click. No tools, no mess – just a clean, reusable display.
Can I use magnetic photo tiles on any surface?
Not quite any surface, but most smooth, non‑porous metal works like a charm – stainless‑steel appliances, painted metal doors, even a metal board you mount on a wall.
If you try a textured brick or a rough wood, the magnets can’t make full contact and the tiles will wobble. A quick test with a regular fridge magnet tells you whether the spot is ready.
How strong are the magnets and will they damage my fridge?
Modern magnetic photo tiles use neodymium magnets that can hold around a pound of weight each, so an 8×8 tile stays put even when the fridge door opens.
Because the magnet is hidden behind a thin layer, there’s no scratching or denting. You can lift a tile off with a gentle tug and it releases cleanly, leaving no residue behind.
How do I clean and maintain magnetic photo tiles?
Dust them weekly with a soft, lint‑free cloth – think of it like dusting a picture frame.
For fingerprints, dampen the cloth with a little water (or a drop of mild dish soap) and wipe gently. Dry immediately to avoid water spots, then give the magnetic backing a quick wipe to keep the pull strong.
What size options are best for different rooms?
Mini‑tiles (2×2 in) are perfect for kids’ doodles or grocery‑list notes, while 8×8 in tiles make a bold focal point in a kitchen or hallway.
Mixing sizes adds visual rhythm – a large vacation photo paired with a few smaller recipe cards creates balance without feeling cluttered.
Can I customize my own photos on magnetic photo tiles?
Absolutely. Upload your favorite image, choose a finish (glossy for vibrant colors or matte for fingerprint‑proof zones), and order the tile. Most services let you preview the layout before you click ‘buy’ so you know exactly how it’ll look on your fridge.
Once it arrives, just peel off any protective backing and stick it where you want – no cutting or framing required.
Do magnetic photo tiles fade over time?
High‑quality tiles come with UV‑protective coating, which slows fading even if the sun hits the fridge for a few hours each day.
To extend life, avoid direct, intense sunlight for long stretches and rotate your tiles every few months. You’ll keep the colors bright and the memories vivid for years.


