

Ever stared at your fridge and thought, "I wish my favorite moments could stick around, literally?"
We've all been there—photos piled on the mantle, postcards tacked to the wall, but those memories fade or get lost in the shuffle. What if you could turn a simple snapshot into a tiny piece of art that lives right where you see it every day?
That's where diy photo magnets come in. Imagine a sunny beach photo, your kid's first soccer goal, or that goofy selfie from last summer—now they’re magnetized, ready to brighten your kitchen, office, or even your locker. No more scrolling through phone galleries; you just glance at the fridge and get an instant smile.
Sounds easy, right? Maybe you're thinking you need fancy tools, expensive printers, or a craft degree. Truth is, you only need a few everyday supplies and a pinch of curiosity. And if you're anything like me, you love a project that feels doable on a lazy Saturday afternoon.
So, why should you give diy photo magnets a try? First, they're a personal touch that cheap store-bought magnets can't match. Second, they're a fun way to recycle old prints or digital files you love. Third, they make great gifts—think grandparents, teachers, or a roommate who needs a little homey vibe.
In the next sections we'll walk through picking the right materials, printing tips that keep colors vibrant, and the step‑by‑step assembly that even a beginner can follow. We'll also share a few creative twists—like using glittery backs or adding a splash of paint—to make each magnet truly yours.
Ready to turn those memories into magnetic moments? Let’s dive in and start crafting something that sticks, both literally and emotionally.
And remember, each magnet you create is a tiny reminder that the moments you cherish can be displayed proudly, everyday.
TL;DR
DIY photo magnets let you transform favorite snapshots into handy kitchen décor using just a few household supplies and a splash of creativity.
In minutes you’ll have personalized magnets that brighten your fridge, make thoughtful gifts, and keep cherished moments visible every day without pricey tools or expertise or training.
Step 1: Gather Your Materials and Tools
Before you dive into the actual sticking and sealing, take a minute to line up everything you’ll need. It sounds simple, but having the right bits on hand turns a “maybe I’ll try this later” into a satisfying Saturday‑afternoon project.
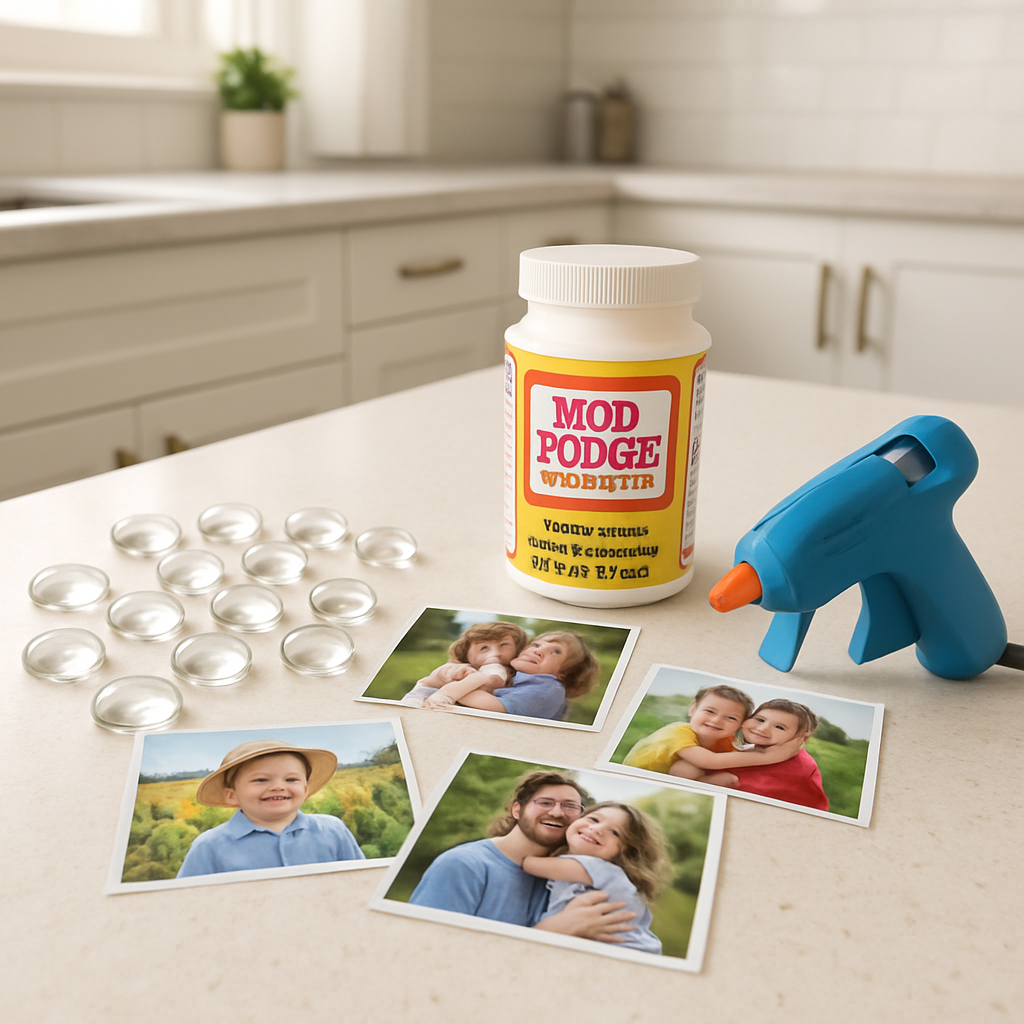
Core supplies you can snag at home or the dollar store
Grab a handful of flat‑backed glass beads or marbles – the kind you’d find in the floral aisle. The flat side lets you glue a magnet on the back, and the clear surface lets your photo shine through. As Amy from Mod Podge Rocks points out, “flat‑back beads are the secret sauce for picture magnets” according to her glass‑marble tutorial.
Next, print your pictures on laser‑jet paper (or use copies of old prints). Laser‑jet ink stays dry and won’t bleed when you seal it.
You’ll also need a small bottle of Mod Podge Gloss – it dries clear, holds the photo in place, and gives the glass a nice shine. Avoid the “Dimensional Magic” formula; it’s meant for 3‑D effects, not adhesion.
Magnets and adhesives
Pick up small neodymium or fridge‑magnet discs. If you’re on a budget, the plain rubber‑backed ones from any craft store work fine. A hot‑glue gun with a headlight makes attaching the magnet a breeze, and the heat helps the glue set quickly.
Optional extras: scrapbooking paper for a decorative border, a tiny hole punch (about 1 in) for cutting the glass beads, and a pair of scissors.
Does this list feel overwhelming? Not at all – most of these items are already in a typical household craft stash, and the rest are a quick trip to the Dollar Tree.
Quick checklist
- Flat‑back glass beads or marbles (clear)
- Laser‑jet printed photos (1‑inch size works well)
- Mod Podge Gloss
- Small magnet discs
- Hot‑glue gun (cordless with headlight is a treat)
- Scissors or craft knife
- Hole punch (optional for shaping beads)
Got everything? Great. Let’s see how these pieces come together in the next step.
So, what’s the best way to keep your workspace tidy while you’re gluing? Lay down a piece of parchment paper – it catches any stray glue and makes cleanup a snap.
Watch that quick video for a visual walkthrough of gathering your tools. Seeing the process in action can save you a handful of trips back to the store.
One tip from a seasoned crafter: after you coat the glass bead with a thin layer of Mod Podge, press the photo onto it and smooth it with your fingertips. The glue sets in about 15‑20 minutes, so you can line up a few magnets at once without feeling rushed.
Need a reminder of why these tiny supplies matter? The clear glass acts like a tiny window, turning a flat snap into a miniature gallery that lives on your fridge. It’s the little‑scale version of a museum display – only you decide what moments get the spotlight.
And if you’re wondering whether you need a fancy cutter or press machine, the answer is a big, confident “no.” The DIY route keeps costs low and the creative control in your hands. (If you ever want to scale up, MPRO offers full‑size magnet‑making kits, but for a starter batch you’re good with scissors.) MPRO explains what a professional setup looks like.
Ready to roll? Gather those beads, print a few favorite shots, and keep the Mod Podge within arm’s reach. The rest of the guide will walk you through cutting, gluing, and sealing – all in a way that feels as easy as sipping coffee on a lazy Sunday.
Step 2: Prepare Your Photos for Magnet Making
Now that you’ve gathered your beads, Mod Podge, and magnets, the next hurdle is the photos themselves. It’s easy to skim over this part, but the way you prep your images determines whether the final magnet looks crisp or looks like a blurry souvenir.
Choose the right file format and size
Print on laser‑jet paper if you can – the ink stays dry and won’t bleed when you apply the glue. Aim for a 1‑inch to 2‑inch square; anything larger can overwhelm a tiny glass bead. If you’re pulling images from your phone, export them at 300 dpi for sharpness. A quick test: print a single photo, hold it up to a light source, and see if the edges stay crisp.
Do you have old prints lying around? Those can be rescanned at a high resolution and treated the same way. Reviving a class‑photo or a Polaroid adds a nostalgic twist that friends love.
Print with the right paper
The squared.one tutorial recommends using a self‑adhesive magnetic foil as the base, but for the photo itself you’ll want a glossy laser‑jet sheet or a matte photo paper if you prefer a softer look. The foil is only $12 for a pack of ten sheets, and it sticks well to most fridge surfaces (self‑adhesive magnetic foil).
Tip: If you print multiple mini‑photos on one A4 sheet, you can cut them later with a sharp X‑Acto knife. This saves paper and keeps the color consistency across the batch.
Trim with precision
Here’s where patience pays off. Use a metal ruler and a fresh blade – a dull blade will tear the paper and leave ragged edges. For round magnets, cut a small circle with scissors first, then trim the photo to match. For square or rectangular shapes, a ruler and blade give a clean line in seconds.
Pro tip: Place a piece of cloth over the photo while you trim. It prevents fingerprints, which can show up as smudges once you seal the magnet.
Apply a protective coating
Before you slap the photo onto the glass bead, give it a thin coat of Mod Podge. This does two things: it seals the image from moisture and it creates a tacky surface for the bead to cling to. Spread a pea‑sized amount with a foam brush, then lay the photo smooth, starting at one edge and smoothing toward the opposite side to push out bubbles.
Wait 15‑20 minutes for the glue to set. If you’re feeling ambitious, you can batch‑process three or four photos at once – just keep an eye on the drying time so you don’t end up with a sticky mess.
Check color fidelity
Once the coating is dry, hold the photo up to a lamp. Do the colors look true to the original? If they seem washed out, you may have used a matte paper that absorbs too much light. In that case, a second thin layer of Mod Podge can boost the shine and bring the hues back.
Real‑world example: I printed a sunset beach shot on glossy laser‑jet paper, gave it a single Mod Podge coat, and the final magnet looked almost as vivid as the original photo. A friend who used matte paper needed two coats to get a comparable pop.
Final checklist before gluing to the bead
- Photo printed at 300 dpi on laser‑jet or glossy paper
- Trimmed to match your chosen bead shape
- One thin, even layer of Mod Podge applied and dried
- Surface free of dust, fingerprints, and stray glue
When everything checks out, you’re ready to attach the magnet disc. If you need a refresher on the whole assembly line, check out How to Make Photo Magnets: Step‑by‑Step DIY Guide for a visual walkthrough of the next steps.
So, does your photo feel ready? Give it a quick glance, make sure the colors sing, and then move on to the glue gun. You’ve just turned a flat image into a piece of kitchen art that will stick around for years.
Step 3: Cut and Shape the Magnet Base
Gather Your Tools
First thing’s first – pull out a pair of sharp craft scissors, a thin utility blade, and a sturdy metal ruler. If you have a small rotary cutter, that’s a bonus, but most of us get by with the basics.
And don’t forget a sanding block or fine‑grit sandpaper; those tiny burrs can turn a perfect magnet into a snag‑hazard on your fridge.
Choosing the Right Magnet Shape
Do you want round, square, or maybe a quirky heart? The shape you pick will dictate how you cut. For round magnets, I like using a 1‑inch hole punch as a guide – it gives you a clean circle without a fancy die.
Square or rectangular bases are easiest with a ruler and blade; just line up the edge, press down, and glide the blade in one smooth motion.
Measuring and Marking
Measure twice, cut once – that old saying still applies. Place the magnet disc on a piece of scrap paper, trace its outline, then transfer that outline onto the magnet sheet.
Pro tip: a lightbox or a sunny windowsill makes the faint pencil line pop, so you won’t miss the edge.
Cutting Techniques
Now for the fun part. If you’re using scissors, hold the magnet sheet taut with one hand and cut slowly along the traced line. Keep the blades perpendicular to the surface; a slanted cut can leave an uneven edge.
When you switch to a utility blade, position the ruler as a fence, score the magnet once, then rotate the sheet 90 degrees and score the other side. After two passes, you’ll have a clean‑cut piece that you can snap off with gentle pressure.
Real‑world example: I once tried to cut a 1‑inch round magnet with just scissors – the result was a jagged circle that caught on my kitchen towels. Switching to a hole‑punch gave me a perfect circle in seconds.
Sanding and Finishing
Even the best cuts can leave a microscopic ridge. Lightly sand the edges with a piece of fine‑grit (220) sandpaper until they feel smooth to the touch. If you notice any sharp spots, a quick rub with a fingertip will reveal them.
For a polished look, give the entire base a brief wipe with a lint‑free cloth dipped in a dab of clear nail polish or a spray sealant. It adds a protective coat that keeps the magnet from rusting over time.
Safety Tips
Neodymium magnets are tiny but surprisingly strong. Keep them away from pacemakers and credit cards, and never let them snap together – that can chip the coating or even cause a small injury.
And always work on a non‑magnetic surface, like a wooden cutting board, to avoid the magnets sticking to your table and slipping out of your hands.
Quick Checklist
- Sharp scissors or a fresh utility blade
- Metal ruler as a cutting guide
- Fine‑grit sandpaper for edge smoothing
- Protective sealant (optional but recommended)
- Safety glasses and a non‑magnetic work surface
Follow these steps, and you’ll have a perfectly shaped magnet base ready for the photo you prepped earlier. Need a visual reference? Check out this quick video tutorial that walks through the cutting process in under two minutes.
Once the base feels smooth and looks the right size, you’re set to move on to the glue‑up stage. Trust me, the extra minute you spend perfecting the shape saves you from a frustrating re‑cut later on.
Step 4: Attach Your Photos to the Magnet Base
Now that your magnet base is smooth and the right size, it’s time to give it a face. Think of the photo as the personality that makes the magnet more than just a piece of metal.
Gather the adhesive supplies
We’ve found that a dab of Aleene’s Original Tacky Glue works like a charm because it stays flexible once it dries, so your picture won’t crack when the magnet is handled.
If you prefer a reusable option, the same tutorial mentions Instant Tacky Reusable Craft Putty. I like the putty when I’m making a batch of magnets – you can press the magnet into the softened putty and it holds securely without any permanent bonding.
Prep the photo surface
Give the back of your trimmed photo a quick wipe with a lint‑free cloth. Any dust or fingerprint will show up as a bubble later, and that’s the last thing we want.
Spread a pea‑sized amount of glue onto the center of the photo. The tip of the glue tube is perfect for this – you get just enough without a mess. If you’re using the craft putty, roll a small ball, flatten it, and press it onto the back of the photo instead.
Position the photo on the magnet
Place the photo face‑down on a clean piece of wax paper. Then, lower the magnet base onto the glued spot. Press gently but firmly, starting from the center and moving outward. This pushes out air and prevents those little bubbles that make the magnet look sloppy.
Do you ever wonder why some magnets look like they have a tiny ripple? It’s usually because the glue was applied unevenly. A quick trick is to use a flat plastic card – the back of a credit card works fine – to smooth the photo while you press.
Seal the front (optional but recommended)
Once the glue has set for about 15 minutes, you can add a protective coat. A thin layer of the same Tacky Glue over the front of the photo gives it a glossy finish and adds extra durability against kitchen splatters.
Let that layer dry completely before you move the magnet. In my kitchen, these sealed magnets have survived the occasional steam blast from a pot without peeling.
Alternative: laminated finish
If you have a laminating pouch or a home laminator, you can give the photo a clear, self‑laminating layer before gluing. The Live Hoppy guide walks through four ways to make laminated picture magnets, and the self‑laminating pouch method is the easiest for a one‑off project (see the laminated picture magnets guide). Just cut the pouch to size, stick the photo in, and seal – then attach the magnet as described above.
Final quick checklist
- Photo trimmed to match magnet shape
- Back of photo clean and dry
- Thin, even layer of Tacky Glue or a ball of craft putty
- Press and smooth to eliminate bubbles
- Optional front seal or laminating layer
- Allow full drying time before handling
And there you have it – a sturdy, vibrant DIY photo magnet that’ll stick around (literally) for years. The extra minute you spend smoothing the glue makes all the difference when you’re pulling the magnet off the fridge later. Ready to move on to the next step?
Step 5: Seal and Finish Your Magnets
Alright, we’ve glued the photo to the magnet – now it’s time to give it a protective hug. A good seal stops moisture, fingerprints, and that dreaded “peel‑off” after a few weeks on the fridge.
Why a seal matters
Ever notice how a glossy photo left in the kitchen gets a faint rainbow after a steam burst? That’s the paper absorbing moisture.
And if you plan to hand these out as gifts, a sealed surface feels more professional – it’s like the difference between a handwritten note and a printed card.
Pick the right sealant
There are three crowd‑pleasers most crafters swear by:
- Mod Podge (matte or gloss) – works as both glue and seal.
- Clear acrylic sealer spray – adds a hard, water‑resistant finish.
- Craft varnish or polyurethane – for an extra‑shiny look.
If you love the “no‑smell, quick‑dry” vibe, the spray sealer is a winner. If you already have Mod Podge on hand, you can simply brush a second coat over the front and even the back, just like Laura Radniecki does in her tutorial where she coats both sides to eliminate tackiness.
Step‑by‑step sealing
1. Prepare your workspace. Lay down newspaper or a silicone mat. A well‑ventilated area is a must if you’re using a spray.
2. Lightly sand any rough edges. A quick rub with fine‑grit sandpaper ensures the seal coats evenly.
3. Apply the first coat. Using a foam brush, spread a thin layer of Mod Podge over the photo’s front. Don’t overdo it – a film of glue, not a puddle.
4. Flip and repeat. Turn the magnet over and give the back the same treatment.
5. Let it dry. Mod Podge needs about 15‑20 minutes; a spray sealer usually cures in 10 minutes. Keep the magnet flat so it doesn’t drip.
6. Add a protective top coat. For extra durability, spritz a clear acrylic sealant on the front (and back, if you like). Hold the can 12‑18 inches away and use steady, sweeping motions.
7. Cure completely. Wait at least 24 hours before handling or sticking the magnet to the fridge. This gives the sealant time to harden fully.
Pro tips for a flawless finish
Work in a low‑humidity room. High moisture can cause the seal to cloud.
If you notice bubbles, pop them with a pin before the coat dries.
For a matte look, stick with Mod Podge matte; for a photo‑gallery shine, choose the gloss version.
A tiny dab of clear acrylic sealer over the edges (the side walls) seals the seam where the photo meets the magnet – a step many skip but that makes the difference between “nice” and “museum‑grade.”
Final checklist before you call it done
- Both sides brushed with a thin, even layer of sealant.
- No visible bubbles or drips.
- Edges sanded smooth and sealed.
- Drying time respected – at least 15 min for Mod Podge, 24 hr for full cure.
- Magnet sits flat on the fridge without wobbling.
When you step back and see that glossy, protected picture, you’ll know the extra minute of sealing was worth it. Your DIY photo magnets are now ready to survive kitchen chaos, kids’ sticky fingers, and even the occasional accidental splash.
Go ahead, stick one on the fridge and watch a smile appear. Want to make a whole set? Just repeat the sealing steps – the process is quick enough to become a weekend ritual.
Step 6: Comparison of Popular Magnet Materials
Now that we’ve sealed the photo and it’s looking glossy, the next decision feels oddly technical: which magnet should actually hold that picture to your fridge? Trust me, the right material can turn a flimsy souvenir into a kitchen‑hero that survives kids, pets, and the occasional splash.
What’s on the market?
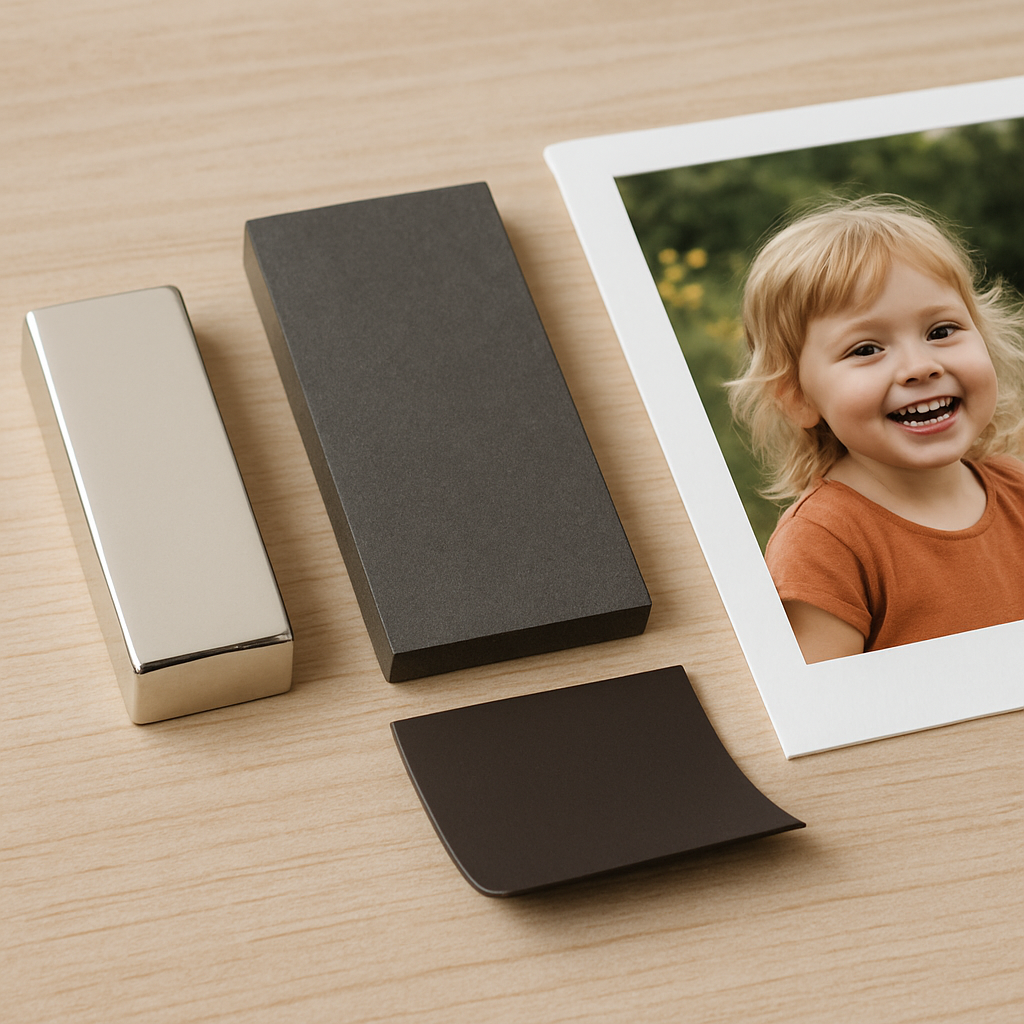
Most crafters reach for three families of magnets – neodymium (the “super‑magnet”), ferrite (the classic “ceramic” type), and flexible rubber‑based sheets. Each one has a personality, and picking the right one depends on how you plan to use your DIY photo magnets.
Neodymium magnets are tiny powerhouses. They’re the same stuff you see in high‑tech speakers or magnetic hooks that hold a full toolbox. If you want a photo that hugs the fridge without wobbling, this is the go‑to. The trade‑off? They’re pricier and a bit brittle, so you’ll need a gentle touch when cutting.
Ferrite magnets are the workhorses of the crafting world. They’re cheap, readily available in bulk, and they’re forgiving when you trim them with scissors or a craft knife. They don’t have the pull of neodymium, but for a 2×3‑inch photo they’re usually strong enough to stay put.
Flexible rubber magnets give you the best of both worlds – they bend, they conform to curves, and they’re safe for kids to handle. The downside is that they’re the weakest in terms of hold, so they’re best for lighter photos or for decorative spots where the fridge isn’t slammed open often.
How to choose the right one for your project
Ask yourself three quick questions: How heavy is the photo? How often will the magnet be moved? What’s your budget?
- Weight. If your image is laminated or you’re adding a thick sealant, lean toward neodymium or a thicker ferrite sheet.
- Movement. For a magnet that will travel between the kitchen and the office, pick something with a firm grip – neodymium or a dense ferrite.
- Cost. If you’re making a batch of 20‑plus gifts, ferrite keeps the price per piece low.
One tip I swear by: test the pull by placing the magnet on a piece of scrap metal and feeling the resistance. If you can lift a metal spoon with it, you’re probably in the sweet spot for a standard photo.
Handling tips (so you don’t break anything)
Neodymium loves a good grip but hates a sudden snap. Use a pair of thin gloves and a metal ruler as a guide when you cut it – the metal protects your fingers and the magnet from chipping.
Ferrite can be filed down with a regular nail file. It’s forgiving, but wear a dust mask; the powder can be a bit irritating.
Rubber magnets are the easiest: just snip them with sharp scissors. If you need a clean edge, run a piece of sandpaper along the cut side – it smooths out any ragged bits without breaking the magnet.
And remember, always keep a small piece of felt or a silicone mat under your workpiece. It prevents the magnet from sliding and scratching your workspace.
Quick reference table
| Material | Pull Strength (per inch) | Typical Cost | Best Use |
|---|---|---|---|
| Neodymium | High – can lift several pounds | High | Heavy or frequently moved photos |
| Ferrite (ceramic) | Medium – holds standard photo | Low | Bulk projects, budget‑friendly kits |
| Flexible rubber | Low – gentle hold | Medium | Light photos, kids’ crafts, curved surfaces |
Bottom line: you don’t need a PhD in material science to pick a magnet. Just match the strength to the weight, think about how often you’ll move it, and consider your wallet. With the right magnet in hand, your DIY photo magnets will stay proud on the fridge for years to come.
Conclusion
We've been through the whole journey, from choosing the perfect magnet to sealing your masterpiece, and you’ve seen how a few simple tricks turn a flat photo into a fridge‑worthy keepsake.
So what does it all mean for you?
First, pick the magnet that matches your photo’s weight and how often you’ll move it – neodymium for heavyweight memories, ferrite for budget‑friendly batches, or flexible rubber for kids’ art.
Second, seal the surface with a thin coat of Mod Podge or a quick spray; it keeps moisture out, stops fingerprints, and gives the magnet that glossy, professional feel.
Third, give the edges a little extra love – sand them smooth, then dab a bit of clear acrylic on the side walls so the photo stays snug even when the fridge door bangs.
And remember, the real magic isn’t just in the materials; it’s the personal story you stick on display every day, a tiny reminder of moments worth keeping.
Feeling inspired? Grab a few photos, your favorite magnet type, and a splash of sealant – the whole process takes less than an hour and the result lasts months.
When you see that first magnet proudly holding a memory on your fridge, you’ll know the extra minutes were worth it – and you’ll be ready to make the next one right away.
FAQ
What materials do I need to make diy photo magnets?
First, you’ll need a printed photo or a printed sheet that’s the size you want. Then pick a magnet sheet – neodymium if the picture is thick or you’ll move it a lot, ferrite for budget‑friendly batches, or flexible rubber for kids’ projects. You’ll also want a thin‑coat sealant like Mod Podge or a clear spray, a small foam brush or spray can, fine‑grit sandpaper, and a clean work surface. A pair of scissors or a craft knife, plus a little felt or silicone mat to protect your tabletop, rounds out the kit. Having everything laid out before you start saves you from hunting around mid‑project.
How do I choose the right magnet strength for my photos?
Think about three things: weight, how often you’ll move the magnet, and your budget. If the photo is laminated or you’ve added a heavy sealant, a neodymium magnet’s high pull strength is worth the extra cost – it’ll hug the fridge without wobbling. For standard 2×3‑inch prints, a ferrite sheet usually does the trick and is cheap enough for bulk making. If the magnet will live on a low‑traffic spot or you’re crafting with kids, a flexible rubber magnet is safe and easy, though it won’t hold as firmly. A quick test is to press the magnet against a scrap piece of metal; if you can lift a spoon, you’re in the sweet spot.
Can I use any kind of photo printer for diy photo magnets?
Absolutely. Inkjet, laser, or even a home‑photo printer works fine as long as the ink is water‑resistant or you seal the surface afterward. If you’re printing on glossy paper, a light coat of Mod Podge will protect the ink from smudging when you apply the sealant. For the best colour vibrancy, print at the highest resolution your printer allows – it makes the finished magnet look sharp, especially when the light catches the glossy top coat.
How long does the sealant need to cure before I stick the magnet on the fridge?
Patience pays off here. A thin layer of Mod Podge usually feels dry to the touch after 15‑20 minutes, but you’ll want to let it cure for at least 24 hours before handling the magnet. Spray sealers cure faster – you can usually move the piece after 10‑15 minutes, but a full 2‑hour cure gives the best durability against kitchen humidity and fingerprints. If you’re in a rush, keep the magnet flat on a piece of wax paper while it dries so it doesn’t drip or warp.
Do I need to sand the edges of the magnet sheet?
It’s not mandatory, but smoothing the edges makes a big difference in how professional your magnet looks and feels. A quick pass with fine‑grit sandpaper removes burrs and prevents the photo from catching on rough spots. After sanding, a dab of clear acrylic on the side walls seals the seam where the photo meets the magnet, keeping moisture out and the picture snug even if the fridge door bangs shut.
What’s the best way to store unfinished diy photo magnets?
Lay them flat in a cool, dry place, ideally on a piece of parchment or wax paper so they don’t stick to each other. If you’ve already applied a sealant, make sure the coating is fully cured before stacking. For long‑term storage, a small airtight container keeps dust and humidity at bay, and a piece of cardboard on top protects the glossy surface from scratches.
How can I make my diy photo magnets look more polished?
Little extra steps go a long way. After the first sealant coat, give the surface a very light sand with ultra‑fine (400‑600 grit) sandpaper – it removes any tiny air bubbles and creates a smoother base for the next coat. Then apply a second thin layer of clear acrylic for that glass‑like shine. Finally, wipe the magnet with a lint‑free cloth to erase any fingerprints, and you’ll have a gallery‑quality piece that looks as if it came straight from a professional print shop.


