

Ever open your fridge and feel a tiny wave of panic because the magnets look like a chaotic collage of postcards, kids' art, and random grocery lists?
You're not alone. Most of us start with good intentions—display a favorite family photo or a cute recipe—but soon the magnetic surface becomes a visual junk drawer.
So, how do we go from "magnet mess" to a tidy showcase that actually adds style to the kitchen?
First, we need to acknowledge the emotional tug: those magnets hold memories, reminders, and a bit of personality. That’s why we don’t want to toss them, we just want a better home for them.
Imagine a fridge that looks like a curated gallery, where each piece has its own place, easy to see, and still reachable for a quick note. It feels calm, organized, and—honestly—a little bit proud.
In the next sections you'll learn practical tricks: grouping by theme, using simple accessories like magnetic strips or frames, and even customizing your own photo magnets to match a color scheme.
But don't worry, we won't suggest pricey organizers that look as if they belong in a showroom. Most of the ideas use everyday items or affordable custom magnets you can order from Loveonmagnets.
Think about the moment when you grab a magnet to pin a new grocery list and instantly find it without hunting through a sea of paper. That's the kind of frictionless experience we're aiming for.
We'll walk through a quick inventory step, a sorting method that feels more like a fun kitchen game, and a few layout hacks that keep the fridge functional and visually appealing.
And if you ever wonder whether your favorite photo magnet will stay put, rest assured—our custom magnets are designed with strong pull so they stay exactly where you place them.
By the end of this guide, you’ll have a clear, doable plan to transform that magnetic chaos into an organized, happy space that showcases your memories without the mess.
Ready to turn your fridge into a tidy gallery? Let’s dive in.
TL;DR
Tired of a chaotic fridge, you’ll learn a quick inventory, simple grouping tricks, and affordable magnetic accessories that turn clutter into a tidy, picture‑perfect gallery.
Follow the step‑by‑step guide, pick custom magnets from Loveonmagnets, and enjoy a calm kitchen where every note and memory is instantly visible today for you.
Step 1: Remove All Magnets and Clean the Surface
Ever opened the fridge and thought, "Wow, this looks like a scrapbook exploded on metal?" That's the exact moment you know it’s time for a reset.
So, what’s the first move? You pull every single magnet off the door, no exceptions. Even that tiny souvenir you’ve kept for years gets a temporary home on the counter.
Lay the magnets out on a clean towel or a large plate. Group them loosely – kids' art in one pile, grocery lists in another – just so you can see what you actually have.
Now comes the cleaning part. As home‑organizing experts point out, a sparkling surface is the foundation for any lasting arrangement (source). Grab a soft cloth, warm soapy water, and give the fridge door a gentle wipe‑down. No abrasive scrubbers; you don’t want to strip the paint.
For those stubborn, sticky spots left by old adhesive, a quick spray of diluted white vinegar works like magic. Let it sit a few seconds, then wipe it away with a fresh microfiber cloth.
And because we love a visual cue, here’s a quick video that walks you through the exact motions:
Once the surface is dry, run your hand over it. If you feel any rough patches or see rust, a light sanding with fine‑grit sandpaper followed by another wipe will restore a smooth finish.
Now that the fridge is spotless, you can start thinking about the magnets you really want to keep. This is the perfect moment to explore fresh ideas – like swapping out the old batch for custom designs that match your kitchen palette. Check out our personalized fridge magnets guide for inspiration and tips on choosing the right style.
Separate the keepers from the culprits: any magnet that’s bent, faded, or just doesn’t stick anymore gets the trash can. The rest? Give each a quick wipe with the same cloth you used on the fridge – you’re already in the cleaning zone, so why not?
Finally, lay out the “keep” pile in the order you’d like them to appear. This visual preview helps you avoid a repeat of the chaotic collage you just cleared.
Ready for the next step? With a clean canvas and a curated magnet collection, you’re set to move on to grouping by theme and creating a gallery‑like layout that actually works.

Step 2: Sort Magnets by Category and Frequency of Use
Alright, you’ve got a clean fridge door and a pile of "keepers" in front of you. The next move feels a lot like sorting a junk drawer – you don’t just toss everything into one heap. Instead, you ask yourself, "Which of these actually get used daily, and which are just pretty‑looking souvenirs?" That’s the heart of learning how to organize fridge magnets.
Why categorizing matters
When you break the pile into clear groups, you instantly see patterns. Maybe you have a handful of grocery‑list magnets that you reach for every week, but a mountain of vacation souvenirs that only surface on a nostalgic Sunday. By separating the "high‑frequency" magnets from the "occasional" ones, you give each piece a purpose and a home.
Professional organizers often call this "macro organizing" – the first big sweep that makes the rest of the process feel manageable according to organizing experts. It’s the same idea we used in Step 1, just applied to the magnets themselves.
Step‑by‑step sorting guide
- Gather a few trays or shallow boxes. One for "Everyday", one for "Seasonal/Occasional", and one for "Keep‑only‑if‑it‑means‑something".
- Pick up each magnet and ask a quick question: "Do I need this today, tomorrow, or next week?" If the answer is yes, it belongs in the Everyday box.
- Look for themes. Kids' art, travel souvenirs, recipe cards, inspirational quotes – group similar vibes together. This will later help you create mini‑zones on the fridge.
- Consider frequency of use. Anything that holds a practical function (shopping list, calendar reminder) should sit at eye level where you naturally reach.
- Set aside the "maybe" pile. If you’re on the fence, place the magnet in a separate bin and revisit it after you’ve finished the rest. Often you’ll realize you don’t miss it.
Take a breath after you finish. You should now see three tidy piles instead of a chaotic mess. That visual clarity is half the battle won.
Tips for making the categories work for you
And here’s a little trick: give each category a color cue. Use a small piece of colored masking tape on the edge of the fridge (it peels off easily) to mark where "Everyday" magnets go. Maybe a bright yellow stripe for grocery lists, a soft teal for kids' art, and a neutral gray for occasional keepsakes. The colors become visual anchors, so you don’t have to think twice about where to drop a new magnet.
Another tip is to limit the "Everyday" zone to about six to eight magnets. Anything beyond that starts to feel cluttered again. If you have more than that, consider rotating seasonal items in and out each month.
Real‑world example
Think about my friend Maya. She kept every souvenir magnet from road trips, and every week the fridge door looked like a scrapbook explosion. When she applied the sorting method, she discovered she only used three travel magnets for quick reminders (like a map pin for the next vacation). The rest were moved to a small decorative board in the hallway. Her fridge instantly felt calmer, and she now reaches for the grocery list magnet without hunting through a sea of pictures.
That’s the power of categorizing by frequency – you keep the functional front and store the sentimental back.
Quick checklist before you move on
- ✅ All magnets placed in one of three piles: Everyday, Seasonal/Occasional, Meaningful‑Only.
- ✅ Each pile labeled (hand‑written note works fine).
- ✅ Color cue or small marker set on the fridge for the Everyday zone.
- ✅ Limit Everyday magnets to a manageable number (6‑8).
Now you’ve turned a vague heap into a clear system. The next step will show you how to arrange those categories into a gallery‑like layout that looks intentional, not accidental.
Ready to give your fridge a polished, purposeful look? Let’s keep the momentum going.
Step 3: Choose an Organization System (Grid, Zones, or Magnetic Boards)
Okay, we’ve already sorted the magnets into everyday, occasional, and keep‑only‑if‑it‑means‑something piles. Now the fun part begins: deciding how those piles will live on the fridge door.
Do you picture a tidy checkerboard of photos, or maybe a few tidy “zones” that keep the grocery list at eye level? Maybe you love the idea of a removable magnetic board that you can swap out when the seasons change.
Why pick a system at all?
Choosing a visual framework stops the “just‑throw‑it‑anywhere” reflex. It gives each magnet a purpose, and it makes the next time you grab a reminder feel effortless.
Think about the last time you opened the fridge and stared at a jumble of kids’ art. If you had a pre‑planned grid, you’d know exactly where that doodle belongs and you wouldn’t waste a second hunting for the grocery‑list magnet.
Grid layout – the picture‑frame vibe
Imagine your fridge as a gallery wall. You draw an invisible 3‑by‑9 (or whatever fits) grid and place a magnet in each square. This works great when you have a collection of similarly sized photo magnets or recipe cards.
Steps:
- Measure the usable width of your fridge door and divide by the number of columns you want.
- Mark light pencil lines or use removable masking tape to visualize the squares.
- Start with the magnets you use daily—usually the grocery‑list or calendar—so they land in the most accessible squares.
- Fill the remaining squares with decorative pieces you love, but keep the overall count under 9 to avoid visual overload.
Pro tip: if you love a uniform look, order custom photo magnets from Loveonmagnets that share the same border thickness. That way the grid feels intentional, not accidental.
Zone layout – functional clusters
Zones are less about strict rows and more about “areas of purpose.” You might have an “Everyday” zone at eye level, a “Kids’ Art” zone lower down, and a “Seasonal Keepsakes” zone near the bottom.
How to set it up:
- Identify the height that matches your natural reach—usually the middle third of the door.
- Assign that height to the Everyday zone and reserve it for magnets you need every week.
- Below that, create a Kids’ Art zone; use a bright piece of tape as a visual cue.
- Reserve the bottom edge for occasional items like travel souvenirs or holiday cards.
This approach mirrors the categorizing step we already completed, and it lets you rotate seasonal pieces without rearranging the whole board.
Magnetic board approach – the flexible flip‑over
If you crave change, a magnetic board (or a set of magnetic strips) gives you a detachable canvas. You can hang it on the fridge, swap it out, or even move it to the pantry when you want a fresh look.
Professional organizers often recommend magnetic strips for small kitchens because they free up surface area while keeping the magnets strong as noted by the Wirecutter test kitchen. The board can be as simple as a thin metal sheet cut to size, or a ready‑made magnetic cork board.
Installation steps:
- Choose a board that’s no wider than 75% of your fridge door.
- Attach it with adhesive magnetic strips that won’t damage the finish.
- Lay out your “Everyday” magnets on the board first, then fill in with decorative pieces.
- When the season changes, peel the board off, swap the magnets, and re‑attach.
Because the board is removable, you can experiment without committing—perfect for renters or anyone who loves a seasonal refresh.
Quick decision checklist
- Do you prefer a static, gallery‑like look? → Go Grid.
- Do you need clear functional areas that you can grow into? → Choose Zones.
- Do you love swapping themes or need a portable solution? → Pick Magnetic Boards.
Whichever system you pick, the key is to keep the everyday magnets front‑and‑center and the sentimental extras tucked away but still visible.
| System | Best For | Setup Tips |
|---|---|---|
| Grid | Uniform photo collections, sleek gallery feel | Use masking tape guides; limit to 9‑12 magnets |
| Zones | Mixed media (art, lists, souvenirs) with functional clusters | Mark zones with colored tape; keep everyday zone at eye level |
| Magnetic Board | Seasonal swaps, renters, flexible layouts | Choose board ≤75% fridge width; use adhesive strips for easy removal |
Take a minute now, glance at your piles, and pick the system that feels right. Once you’ve decided, the next step will walk you through arranging the magnets within that framework so the fridge looks intentional, not accidental.
Step 4: Install Additional Magnetic Strips or Boards
Why add extra strips or a board?
At this point you’ve already sorted your magnets, but you might notice a few stubborn gaps – maybe the grocery list keeps sliding, or the kids' art needs a dedicated stretch.
That’s where magnetic strips or a removable board become the secret sauce. They give you extra real‑estate without stealing the whole door, and they let you re‑arrange on the fly.
Choosing the right strip or board
First, measure the usable width of your fridge. A good rule of thumb is to keep any board under 75% of that width so you still have room for other zones.
If you’re in a rental, go for a thin steel sheet or a magnetic cork board that you can peel off later. If you have a permanent kitchen, a heavier stainless‑steel strip can double as a sleek rack for recipes.
Look for adhesive backs that claim “no‑damage removal” – they’re usually a foam‑tape style that won’t yank paint off when you pull them.
Prep the fridge surface
Give the spot a quick wipe with a damp cloth, then dry it. Any residue will weaken the adhesive, and you’ll end up with a strip that slides every time you open the door.
For extra grip, run a dry microfiber over the area; you’ll feel a faint static‑like texture that tells you the surface is ready.
Mounting the strips
Peel the backing off a strip, align it with your measured line, and press firmly for about ten seconds. The pressure helps the adhesive bond to the metal.
Repeat the process for a second strip if you want a longer runway. Space them a couple of inches apart so you can slide magnets between them without crowding.
Once the strips are in place, test them with a couple of everyday magnets. If they slide too easily, add a thin layer of clear packing tape over the strip – it adds friction without compromising the magnetic pull.
Setting up a removable board
Take your board, flip it over, and apply the adhesive strips to the back, following the manufacturer’s spacing guide. Most kits include four corners; place them at each corner for balanced support.
Press the board onto the fridge, starting at the top edge and working your way down. Hold each corner for a few seconds to make sure the bond is secure.
Now, arrange your “Everyday” magnets on the board first – the grocery list, the family calendar, the go‑to recipe card. Then sprinkle in the decorative pieces you love. Because the board is detachable, you can swap out seasonal magnets in a heartbeat.And here’s a little trick: attach a tiny piece of Velcro to the back of a favorite photo magnet. When you need to move it quickly, the Velcro holds it in place on the board, yet releases without a fight.
Quick checklist before you step back
- ✔ Measure the fridge width and keep the board ≤75% of that.
- ✔ Choose adhesive strips labeled “damage‑free removal.”
- ✔ Clean the surface with a damp cloth, then dry.
- ✔ Press strips firmly for at least ten seconds.
- ✔ Test magnet grip; add a thin tape layer if needed.
- ✔ Arrange everyday magnets first, then decorative ones.
- ✔ Remember: the board can be peeled off for a seasonal refresh.
Now you’ve got a flexible canvas that holds the magnets you need at eye level and a spare surface for the extras. The fridge looks intentional, you’ve avoided damage, and you’ve kept the whole thing renter‑friendly.
Take a moment, step back, and notice how the extra strips create a tidy runway for the items you actually use. When the next season rolls around, just peel the board off, swap a few magnets, and stick it back – no tools, no fuss.
Step 5: Arrange Magnets and Maintain Order
Now that your strips and board are in place, it’s time to actually put the magnets where they belong. This is the moment where the fridge stops feeling like a junk drawer and starts looking like a purposeful gallery.
First, think about eye level – that sweet spot about 4‑5 feet up where your hand naturally rests. Anything you need daily – the grocery list, a family calendar, that “don’t forget” note – belongs right there. If a magnet lands lower, you’ll keep reaching for it and the whole system unravels.
So, what should you do with the rest of the pile? Grab the “Everyday” magnets you identified in Step 2 and line them up in a straight row on the board or strip. Keep the spacing even; a small gap of a centimeter lets each piece breathe and makes swapping a breeze.
Use an invisible grid to keep things tidy
Imagine a faint tic‑tac‑toe board drawn with removable masking tape. That’s your visual guide. Place the first magnet in the top‑left cell, then fill the row left‑to‑right. When you hit the edge, drop down to the next line. The result feels ordered without looking rigid.
Need a quick visual cue? A thin piece of painter’s tape in a neutral color works wonders – it peels off without leaving residue, and you can reposition it whenever you rotate seasonal items.
Mix in the decorative pieces – but don’t overstuff
After the functional row is set, sprinkle in the photo or souvenir magnets you love. A good rule of thumb is no more than six to eight pieces per zone; any more and the eye starts to wander.
Here’s a tiny story: my neighbor Maya kept all her travel magnets together on the bottom shelf, and the fridge looked cluttered. When she limited the bottom zone to just three favorites and moved the rest to a small magnetic cork board in the pantry, the whole kitchen felt lighter.
Maintain order with a weekly “magnet check”
Set a five‑minute reminder every Sunday. Flip the board, slide any stray magnets back into their slot, and wipe the surface with a dry microfiber cloth. This quick ritual catches loose pieces before they tumble into chaos.
If a magnet starts to lose its grip, it’s a sign the magnetic strip is wearing thin. A thin layer of clear packing tape over the strip adds friction without sacrificing pull – a trick many organizers swear by.
Seasonal rotation without the mess
When the holidays roll around, swap out a couple of decorative magnets for a festive one, then press the board back onto the strips. Because the board is removable, you can even store it in a drawer during the summer and bring it back when the leaves change.
Pro tip: keep a small envelope on the countertop labeled “Magnet Ideas.” Whenever you bring home a new postcard or a kid’s artwork, tuck it in there. At the next weekly check, decide if it earns a spot on the board or belongs in the envelope for later.
Quick checklist
- ✅ Place daily-use magnets at eye level.
- ✅ Use an invisible grid or tape guide for even spacing.
- ✅ Limit each zone to 6‑8 pieces for visual calm.
- ✅ Add a weekly five‑minute “magnet check” to keep order.
- ✅ Apply clear tape to strips if magnets slide too easily.
- ✅ Rotate seasonal pieces by swapping the removable board.
By treating your fridge like a living board rather than a static wall, you’ll find that the magnets stay exactly where you want them – and you’ll actually look forward to that quick glance each morning. And if you ever wonder whether the magnets are strong enough, remember that high‑quality magnetic strips are praised for their durability and long‑lasting pull by professionals who rely on them daily.
Give it a try today, step back, and enjoy the calm order you’ve created. Your fridge just went from chaos to curated, and you didn’t need a toolbox – just a little patience and a clear plan.
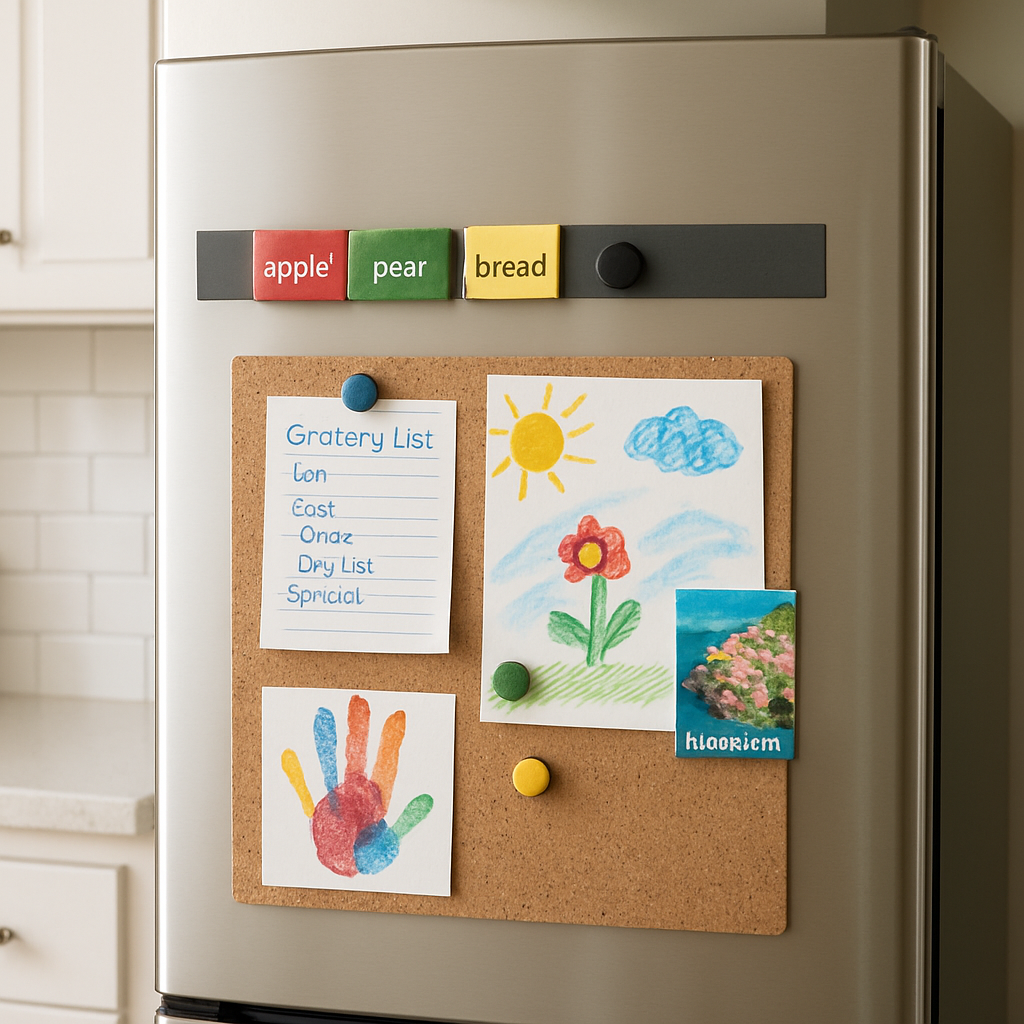
Step 6: Creative Display Ideas for Special Magnets
Now that you’ve got everyday magnets locked in place, it’s time to have a little fun with the ones that are a bit more… special. Think of that souvenir from your beach vacation, a kid’s glittery art piece, or a seasonal holiday card. These items deserve a spotlight, not a hidden corner.
First, ask yourself: where do you naturally glance when you open the fridge? Most of us hover around eye level, then drift down a bit. That’s the perfect runway for a “Featured Favorites” strip. Grab a thin magnetic strip (you can find budget‑friendly ones at any hardware store) and mount it just below the main grid. Then line up three to five standout magnets, spacing them evenly.
Mini‑gallery frame
If you love a curated look, create a mini‑gallery using a magnetic picture frame. These frames are essentially a shallow box with a magnetic back, so you can slide it on and off without leaving marks. Slip in a single large photo magnet or a small collage of travel souvenirs. Because the frame holds everything together, you avoid stray edges and the magnets stay perfectly aligned.
Pro tip: choose a frame that matches the color of your kitchen appliances – brushed stainless or matte black works well in most homes. When the season changes, simply swap the picture inside – no need to re‑drill or re‑stick anything.
Seasonal “magnet carousel”
Imagine a small rotating carousel that sits on the fridge door. You can DIY one with a lazy‑Susan turntable and a magnetic base. Place it near the bottom corner, add a few decorative magnets for each season, and give it a gentle spin when you want to change the vibe. It’s a playful way to keep the display fresh without clutter.
Real‑world example: my neighbor Luis uses a 6‑inch turntable for his holiday lights and magnet collection. He rotates it each month, and the kids love watching the “magnet of the month” appear. It also cuts down on the time he spends hunting for the right piece when a new postcard arrives.
Magnetic cork board for notes and keepsakes
A magnetic cork board gives you a soft surface where pins and magnets coexist. Hang it at the lower half of the fridge, then tack up a few postcard magnets alongside handwritten notes. The cork absorbs any stray glue from paper, keeping the fridge door pristine. Plus, you can easily lift the whole board to change the layout.
Tip: line the board’s edge with a thin strip of decorative washi tape – it adds a pop of color and signals the “special zone” to everyone in the house.
DIY magnetic shadow box
For those ultra‑sentimental items (like a tiny pressed flower or a ticket stub), a magnetic shadow box works wonders. Take a shallow photo frame, attach a magnetic sheet to the back, and place your treasures inside. Hang it on the fridge like any other magnet. The glass front protects delicate pieces while still letting them shine.
When you’re ready to switch things up, just lift the frame and rearrange the contents – no glue, no fuss.
Actionable checklist
- ✅ Pick a dedicated strip or frame for 3‑5 “special” magnets.
- ✅ Use a magnetic picture frame for a mini‑gallery look.
- ✅ Build a simple carousel with a lazy‑Susan for seasonal rotation.
- ✅ Hang a magnetic cork board for mixed notes and keepsakes.
- ✅ Try a shadow box to protect fragile souvenirs.
- ✅ Review the display every month and swap out items that no longer feel special.
By sprinkling these creative ideas into your fridge routine, you’ll still know exactly where that grocery list lives, but you’ll also have a rotating showcase for the moments that matter. It turns an ordinary kitchen surface into a personal museum that evolves with your life – and you won’t need any tools beyond a few magnets and a little imagination.
Conclusion
We've taken the fridge from a chaotic scrapbook to a tidy gallery, step by step.
Do you remember the first time you struggled to find that grocery list among a sea of postcards? That frustration is gone now, thanks to the simple system we built together.
By cleaning the surface, sorting magnets by how often you use them, picking a layout that fits your life, and adding a few extra strips or a removable board, you’ve created a flexible canvas that stays organized month after month.
Here's the quick cheat sheet: keep everyday essentials at eye level, limit each zone to six‑eight pieces, and schedule a five‑minute Sunday check to slide anything out of place.
And when a new souvenir or a kid's masterpiece arrives, you know exactly where it belongs—either in the “featured” strip or the seasonal carousel you set up.
So, what’s next? Take a step back, admire your work, and enjoy the calm that comes from a fridge that actually helps you, not hinders you.
Ready to keep the momentum going? Grab a few custom magnets from Loveonmagnets and let your fridge stay beautiful and functional for years to come.
Enjoy the fresh, organized vibe every time you swing the door open, and watch how a small habit can brighten your whole kitchen.
FAQ
How do I start organizing fridge magnets?
First, take every magnet off the door and lay them on a clean surface. As you pull each one, ask yourself if you need it today, this week, or just for nostalgia. Sort them into three piles: everyday essentials, occasional keepsakes, and truly sentimental pieces. Once the piles are clear, wipe the fridge, then begin placing the everyday magnets at eye level. The rest can find homes in zones, strips, or a removable board.
What’s the simplest way to categorize magnets by how often I use them?
Give each magnet a quick “frequency” rating. Anything you reach for daily—grocery lists, family calendars, meal‑plan cards—goes in an “Everyday” bin. Items you only need monthly, like seasonal recipes or holiday cards, belong in an “Occasional” bin. The sentimental bin is for photos or souvenirs you love but don’t need for tasks. Label the bins with a sticky note or a small piece of tape so the system stays visible.
How can I keep magnets from slipping off the fridge over time?
Strong magnetic strips or a thin metal board provide a consistent pull that older magnets can’t match on their own. If a magnet feels loose, add a tiny strip of clear packing tape over the area—it adds friction without reducing magnetic strength. Periodically (once a month is fine) wipe the surface with a dry microfiber cloth; dust and oil are the main culprits that weaken the grip.
Should I use magnetic strips or a removable board, and when does each make sense?
If you love swapping themes often—think holiday décor or kids’ art—go for a removable board. It lets you peel off the whole layout, refresh it, and stick it back without leaving marks. Magnetic strips are great for a permanent “runway” for everyday items; they stay hidden and keep the main display tidy. In small kitchens, a strip can free up precious door space while a board adds flexibility in larger homes.
How often should I do a quick “magnet check” to maintain order?
Set a five‑minute reminder on a Sunday or whichever day you usually do kitchen chores. During that check, slide any stray magnets back into their assigned zone, wipe the surface, and reassess if any piece belongs in a different category. It’s a tiny habit that prevents the fridge from slipping back into chaos, and you’ll notice the difference the next time you open the door.
My kids produce a lot of artwork—how can I showcase it without clutter?
Create a dedicated “Kids’ Art” zone a few inches below eye level. Use a magnetic strip or a small cork‑board that sits just under the everyday zone. Rotate the pieces weekly: keep the newest masterpiece on display, and store older ones in a portfolio folder. This way the fridge stays functional, and the kids still feel proud seeing their work front‑and‑center.
Can I personalize my fridge magnets and still keep the system tidy?
Absolutely. Custom photo magnets add personality, but treat them like any other magnet in your categorization system. Choose a handful—maybe three to five—that you love most and place them in the “Featured” strip or a mini‑gallery frame. The rest can live in the occasional bin or on a removable board for seasonal swaps. By limiting the number of custom pieces on the main surface, you keep the layout clean while still showcasing your style.


