

Ever opened your fridge and caught a glimpse of that goofy photo strip from last summer's beach trip, and thought, "I wish this could stay right here forever"?
Well, you’re not alone—so many of us turn our favorite moments into little magnetic souvenirs.
What if I told you there’s a way to turn any photo strip into a cute, stick‑on magnet that lives right on your fridge, office board, or even a locker?
Enter photo strip magnets: those retro‑style, four‑panel strips you see at parties, now with a magnetic backing that lets you display them anywhere you want.
Imagine the kids’ faces lighting up when they see their birthday party snapshots hanging on the kitchen door, or you spotting that candid shot of your best friend mid‑laugh every time you grab a snack.
And it’s not just for homes—small businesses love them too. A coffee shop can showcase a weekly “customer of the week” strip on the service window, or a boutique can highlight new arrivals with a rotating magnet gallery.
Here’s a little story: the other night I printed a photo strip from my cousin’s wedding, slapped it on the fridge, and it instantly became the conversation starter during dinner. Everyone kept pointing at the goofy dance move in the third frame.
Does that sound like something you’d enjoy, or maybe you’re wondering if they’re worth the hassle?
Honestly, the process is simple: choose your favorite strip, upload it to a custom‑magnet service, and in a few days you’ve got a set of magnets that look just like the original photo booth strips.
And because they’re magnetic, you can rearrange, swap, or even take them on the road for a quick memory boost wherever you go.
So, let’s dive in and explore how photo strip magnets can turn everyday moments into lasting, magnetic memories.
Ready to start your own magnetic gallery?
TL;DR
Photo strip magnets turn your favorite snapshots into magnetic keepsakes you can stick on fridges, lockers, or office boards, instantly sparking conversation and nostalgia.
Create yours in minutes, swap frames whenever you like, and enjoy a personal gallery that travels with you wherever you need a quick memory boost today.
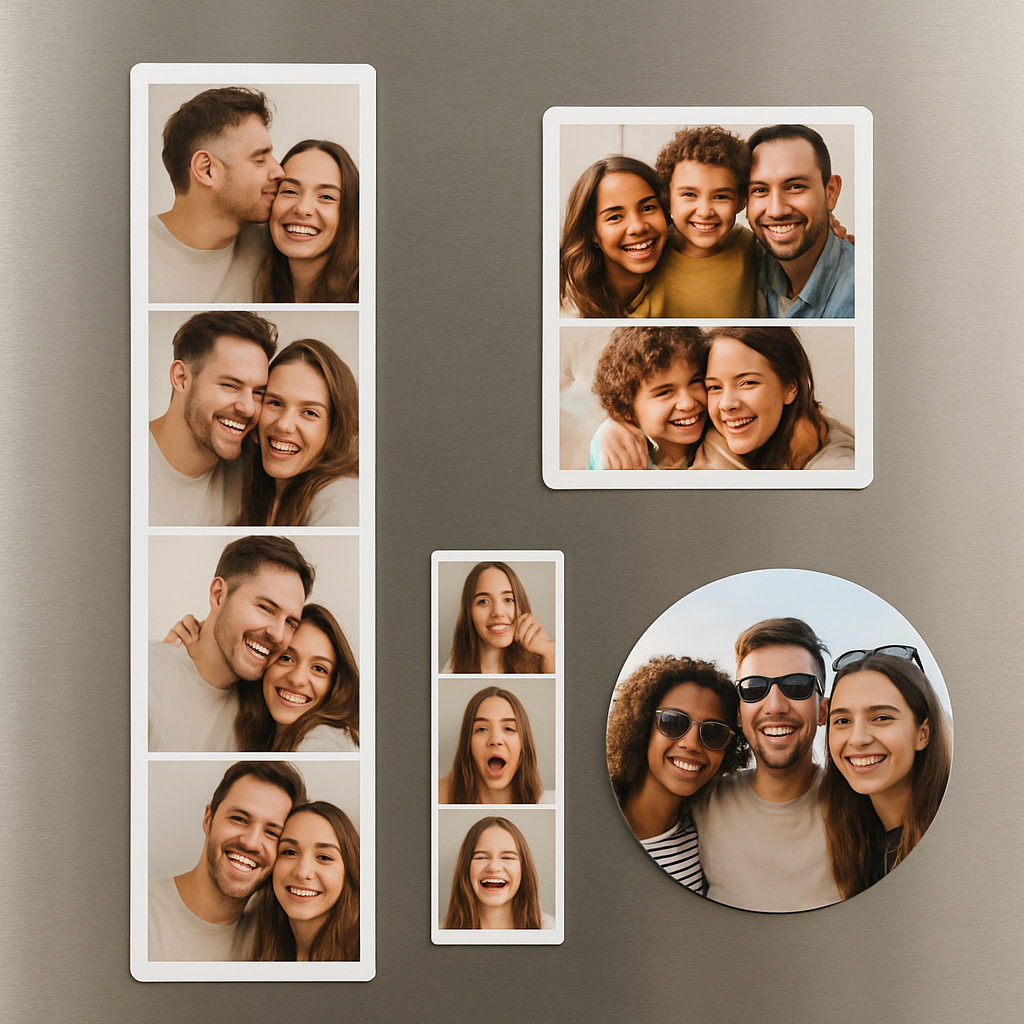
Step 1: Choosing the Right Photo Strip Magnet Size and Shape
First thing’s first – you’ve got the strip, now you need to decide how big it should be. The size you pick determines where the magnet will live, how often you’ll see it, and whether it feels cramped or airy on the fridge.
Match the space, not the ego
Take a look at the surface you plan to use. A standard kitchen fridge door has a lot of real estate, so a 4×6‑inch strip (the classic photo‑print size) works great. If you’re thinking about a locker or a tiny office whiteboard, drop down to a 3×4‑inch strip – it’s still recognizable but won’t overwhelm.
And remember: you’re not limited to the textbook sizes. Many vendors let you customize the width and height in half‑inch increments, letting you fit a strip into a tight corner or stretch it across a broader canvas.
Shape matters, too
Rectangular strips are the default, mimicking the old‑school photo booth layout. But a square magnet can give a modern vibe, especially if your photos are already square (think Instagram). Round magnets add a playful touch, perfect for kids’ birthday strips.
Here’s a quick rule of thumb: if the strip tells a story (like a birthday sequence), stick with a rectangle so the frames flow naturally. If the strip is a single moment (a goofy selfie), feel free to experiment with a heart or circle for extra personality.
Real‑world examples
Imagine you’re a coffee shop owner. You want a weekly “Customer of the Week” magnet on the service window. A 5×7‑inch rectangle lets you showcase four mini‑photos and a tiny promo blurb without looking cramped.
Or picture a college dorm room. A student wants to display a vacation strip on a small locker door. A 3×5‑inch square fits nicely, and the shape matches the dorm’s minimalist aesthetic.
Actionable checklist
- Measure the intended surface (width × height).
- Pick a size that leaves at least ½ inch of breathing room on each side.
- Choose shape based on photo orientation and the vibe you want (rectangle = classic, square = modern, round = fun).
- Order a sample or use a printable template to visualize before committing.
Need a hassle‑free way to see all the options? Our custom fridge magnet guide walks you through selecting dimensions, uploading your strip, and previewing the final product.
Finally, keep the future in mind. If you think you’ll swap strips often, go for a size that works with most standard frames you already own. That way you can change the memory without re‑ordering a new magnet each time.
Step 2: Designing Your Photo Strip Layout
Okay, you’ve picked the size, now it’s time to give those four frames a shape that actually tells a story. Think of it like arranging a mini‑comic strip on a tiny canvas – every panel needs breathing room, a clear direction, and a little personality.
Map the storyboard first
Grab the raw photos and lay them out on a table, screen, or even a piece of scrap paper. Ask yourself: which image introduces the moment? Which one delivers the punchline? Usually the first frame sets the scene, the middle two build tension, and the last one lands the laugh or kiss.
If you’re showcasing a birthday party, you might start with the cake, then a close‑up of candles, a goofy group selfie, and finally the “blow out the candles” action. By visualizing the narrative before you digitize, you avoid a jumbled magnet that looks like a random collage.
Choose a visual flow
Most photo strip magnets default to a left‑to‑right flow because that’s how we read. But don’t be afraid to flip it. A vertical stack works wonders on a narrow fridge door or a locker shelf. In fact, a 3×5‑inch square magnet can be turned into a vertical column of four 1‑inch‑high panels, letting the eye travel down instead of across.
Pro tip: align the dominant colors of each frame so they transition smoothly. If your third photo is bright red, consider adding a thin red border to the second frame – it creates a visual bridge and makes the whole strip feel cohesive.
Play with color, borders, and text
Most services let you add a background color or a subtle pattern behind the photos. Pick a hue that complements the dominant tones in your images. For a beach vacation, a soft teal or sunrise orange works like a charm.
If you want to include a short caption – “Emma’s 10th birthday” or “Summer ’24” – keep it under 12 characters and place it in the bottom margin of the last frame. Too much text clutters the magnet; a tiny label is enough to anchor the memory.
Test and tweak before you order
Upload your layout to the mock‑up tool most printers provide. Zoom in to 100 % and check that no face is cut off, that the border isn’t too thick, and that the magnetic backing will still be strong enough (most vendors guarantee at least 0.5 lb pull).
Print a cheap paper version first – you can cut it with scissors and tape it to the fridge to see how it feels. If the strip looks cramped, shrink the border by 0.1 inch or drop a non‑essential photo.
Actionable checklist
- Lay out the raw photos in story order; decide which frame is the “hero.”
- Pick a flow that matches your display surface (horizontal for wide doors, vertical for narrow spots).
- Select a background color that echoes the dominant hue of your images.
- Add a concise caption only to the final panel, if needed.
- Use the vendor’s preview tool; print a paper mock‑up to verify spacing.
- Adjust border thickness or panel size before confirming the order.
When you follow these steps, you’ll end up with a photo strip magnet that not only fits your fridge but also walks you through the memory every time you open the door.
Step 3: Printing and Assembling Photo Strip Magnets
Now that your layout is polished, it’s time to turn those pixels into something you can actually stick on the fridge. The printing stage feels a bit like waiting for a pizza – you know it’ll be worth the few days of anticipation.
Pick a reliable print partner
Not every printer treats a thin strip the same way a full‑size photo does. Look for services that explicitly list “photo strip magnets” or “photo booth strips” in their catalog. For example, Social Print Studio prints on 260 gsm Kodak professional paper with a luster finish, which gives each panel a crisp, glossy feel that survives kitchen humidity according to their product page.
File prep: size, bleed, and resolution
Export your design as a high‑resolution PDF (300 dpi) and add a 0.125‑inch bleed around every edge. The bleed ensures the magnetic backing doesn’t cut into a photo when the strip is trimmed. If you’re using a custom size like 7.3″ × 1.9″, double‑check the dimensions in the printer’s template – a mismatch can leave you with a crooked magnet.
Actionable checklist
- Save as PDF, 300 dpi, CMYK.
- Add 0.125‑inch bleed on all sides.
- Include a thin “safe zone” 0.05 inch inside the border for any text.
- Upload to the printer’s mock‑up tool and preview at 100 %.
Printing the strips
Once the file is uploaded, most services let you choose between a standard glossy finish or a matte luster. Glossy looks vibrant on bright kitchen lights; matte reduces glare if you’ll hang the magnet near a window. Choose a magnetic backing that guarantees at least a 0.5 lb pull – that’s the sweet spot for staying put on stainless steel without sliding off a magnetic whiteboard.
Orders typically ship in 3‑7 business days, so you can have a fresh batch ready for a birthday or a weekend market stall without a long wait.
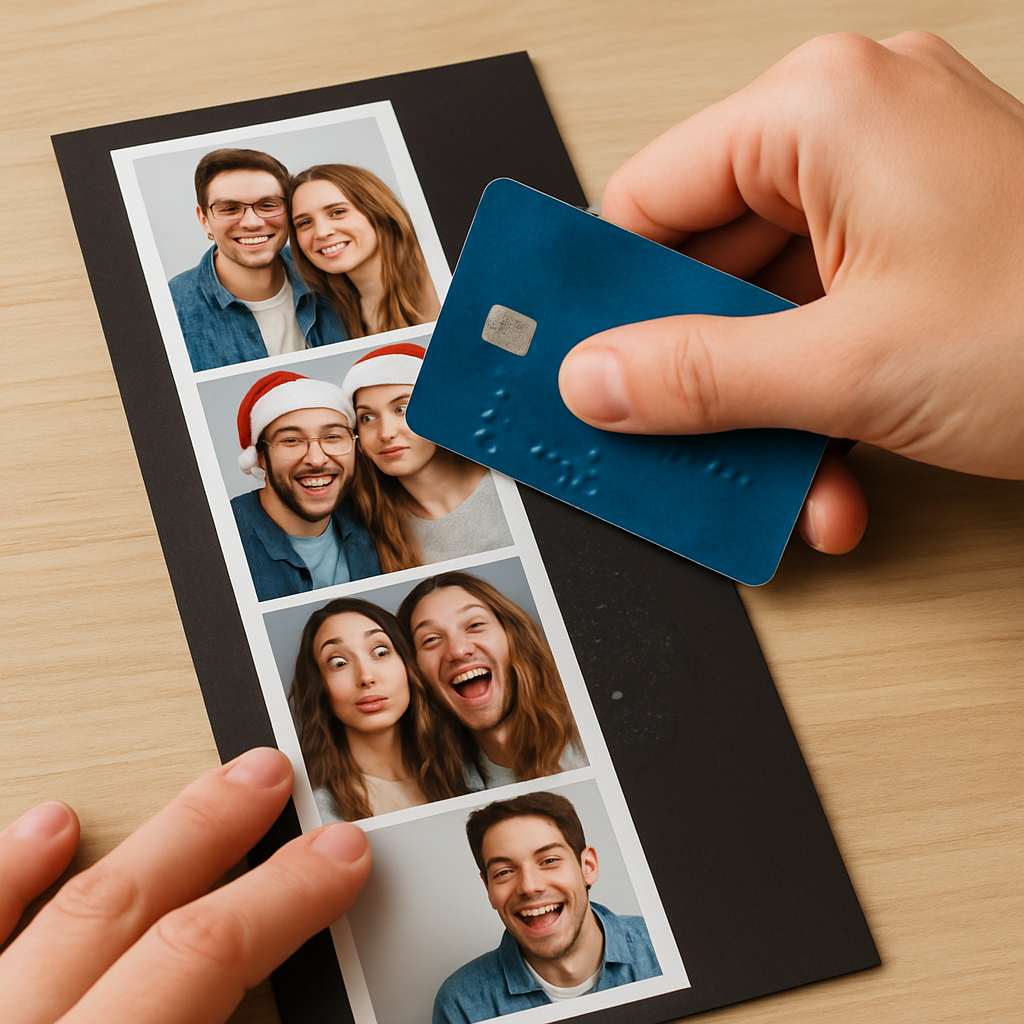
Assembling your magnet
When the strips arrive, you’ll have two pieces: the printed photo strip and a thin magnetic sheet (usually 0.03‑inch thick). Here’s a quick, no‑fuss way to bond them:
- Lay the magnetic sheet on a clean, flat surface, glossy side down.
- Align the printed strip with the magnetic sheet, making sure the edges line up exactly.
- Use a roller or the back of a credit card to smooth out bubbles, working from the center outward.
- Trim any excess magnet with a sharp hobby knife, leaving a 0.1‑inch margin around the strip.
- Optional: Apply a thin layer of spray adhesive on the back of the magnet for extra hold on high‑traffic surfaces.
And that’s it – you’ve got a ready‑to‑stick photo strip magnet.
Pro tips from the pros
One photographer I talked to swears by cutting the magnet a hair longer than the strip; the extra edge wraps around the paper and prevents peeling over time. Another tip: store finished magnets flat in a dry drawer for 24 hours before the first use – it lets the adhesive set fully.
Need a visual cue? Watch the short walkthrough below.
Quick comparison of print & assembly options
| Feature | Option | Notes |
|---|---|---|
| Paper type | 260 gsm Kodak luster | Glossy, durable, good for kitchens |
| Magnet strength | 0.5 lb pull | Holds on fridge, locker, whiteboard |
| Finish | Gloss vs. matte | Glossy = vibrant; matte = glare‑free |
Step 4: Caring for and Displaying Photo Strip Magnets
Now that your photo strip magnets are glued and ready, the fun part begins – figuring out how to keep them looking fresh and make them work for you every day.
Let it set
First, give the adhesive a little breathing room. Even though the magnet sticks right away, waiting 24‑48 hours before the first big slam on the fridge lets the glue set fully. I’ve left a batch of new magnets on my kitchen counter for a full day, and they never wobble later.
Placement matters
Next, think about placement. If you’re in a busy family kitchen, the door gets slammed a lot, so choose a spot near the top where the magnet isn’t constantly knocked off. For a home office whiteboard, a lower stripe is perfect because you’ll see it while you write notes. The rule of thumb: place magnets where they’re seen but not in the direct line of traffic.
Cleaning basics
Cleaning is surprisingly easy. A damp microfiber cloth wipes away splatters without hurting the magnetic backing. Avoid harsh chemicals – a little dish soap and water does the trick. If the surface gets sticky from fingerprints, a quick swipe with a dry cloth restores the shine.
Moisture protection
What about humidity? Kitchen fridges can get steamy, especially after cooking. Because most photo strip magnets use a 260 gsm Kodak luster paper, they tolerate a bit of moisture, but prolonged exposure can cause the edges to lift. I keep a thin silicone mat behind the strip on the fridge shelf; it acts like a barrier and adds a subtle pop of color.
Pro durability tips
Let’s talk durability tricks from the pros. One photographer I know always adds a clear UV‑protective spray on the printed side before the magnet goes on the fridge. The spray doesn’t affect the magnetic pull but blocks kitchen light from fading the colors over months. Another tip: rotate the magnets every few weeks. Swapping a birthday strip for a vacation one not only refreshes the look but also spreads wear evenly.
Real‑world example
Real‑world example: a boutique coffee shop ordered a set of “Customer of the Week” photo strip magnets. They mounted them on a stainless‑steel service window and noticed that after two weeks the magnets started to curl at the edges. By adding a thin sheet of clear acrylic behind each strip, the shop stopped the curling and the magnets stayed flat for the entire season.
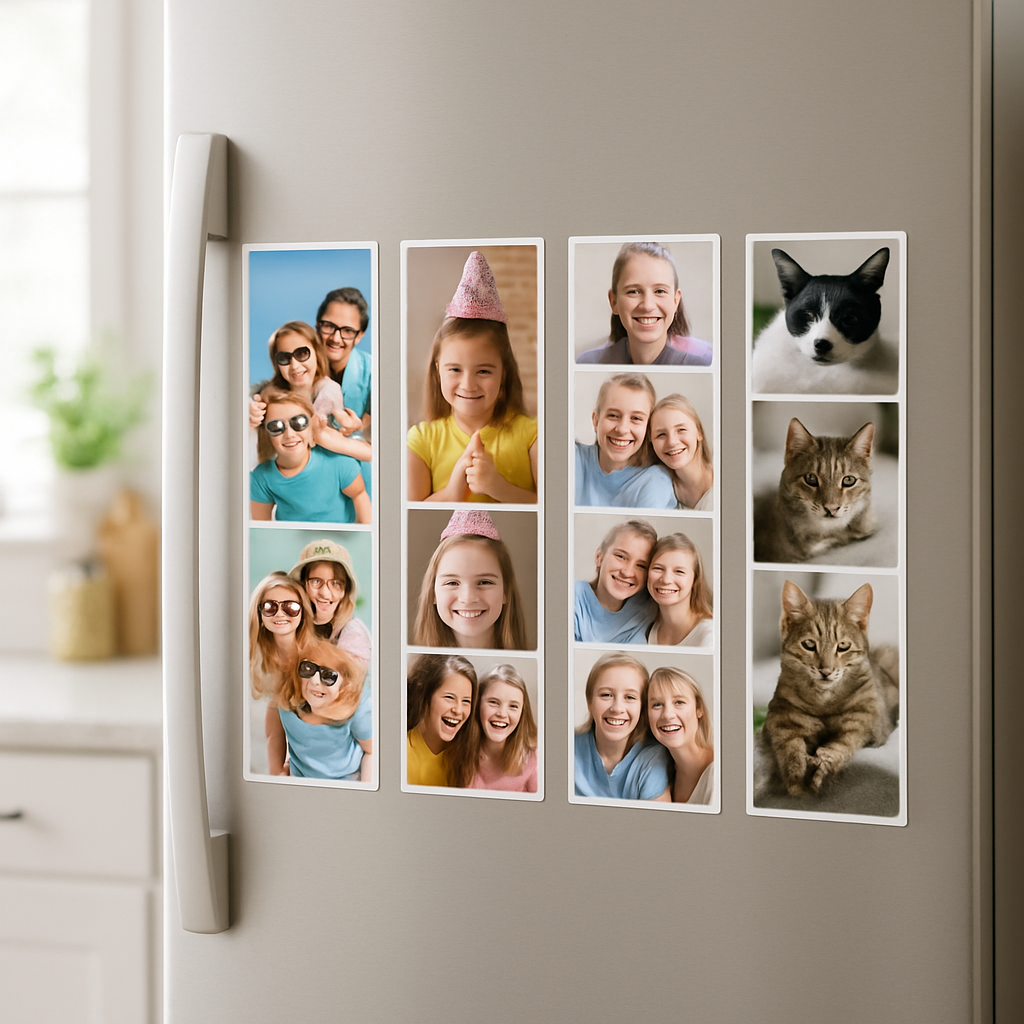
Build a magnetic gallery
If you want a gallery feel, use a magnetic board instead of the fridge. Paint a 4 × 6 inch section of the board with chalk paint, then arrange several strips in a grid. The chalk surface lets you write dates or captions right next to the photos, turning a simple magnet into an interactive memory board.
Quick care checklist
Here’s a quick checklist you can print and tape next to your fridge:
- Wait 24 hrs before the first big placement.
- Wipe with a damp microfiber cloth, no abrasive cleaners.
- Avoid direct steam; add a silicone mat if needed.
- Consider UV‑protective spray for high‑light areas.
- Rotate strips every 3‑4 weeks to even out wear.
- Use a magnetic board for a larger gallery.
Bottom line? Caring for photo strip magnets is low‑effort, and a few mindful habits keep them vivid for years. So go ahead, stick them everywhere you love, and let those moments keep popping up whenever you open a door.
FAQ
What are photo strip magnets and how do they work?
Photo strip magnets are tiny four‑panel strips that look like classic photo‑booth prints, but with a thin magnetic backing glued to the back. The magnet lets you stick the strip to any ferrous surface – fridge, locker, whiteboard – and pull it off without damaging paint or the photos. Because the paper is usually a coated cardstock, the images stay crisp even after weeks of handling, and the magnet strength is just enough to stay put yet easy to move.
Can I use photo strip magnets outdoors or on non‑magnetic surfaces?
Not really. The magnetic layer only adheres to metal, so a kitchen fridge or a steel office board works perfectly, but wood, glass, or painted drywall won’t hold. If you love the look outdoors, you can attach the strip to a small metal sheet or a magnetic paint‑on panel that you mount on a wall. That way the magnet still does its job while the backing protects the photos from the elements.
How long will the colors stay vibrant?
Most vendors print on a glossy or luster‑coated cardstock that resists fading for several months under normal indoor lighting. To extend life, keep the magnets away from direct sunlight and avoid harsh chemicals when you clean. A quick spray of clear UV‑protective coating (available at craft stores) adds an extra barrier without affecting the magnetic pull, so you’ll still see those bright beach blues and birthday reds for a good while.
Do I need special tools to apply or remove a photo strip magnet?
Nope, just your hands. The magnet is designed to stick firmly but release with a gentle peel. If you’re worried about leaving a tiny residue, give the surface a quick wipe with a dry microfiber cloth before you stick the next strip. When you do need to lift one off, slide a fingernail under the edge and pull slowly – the paper won’t rip, and the magnet stays flat for the next use.
What’s the best way to organize multiple strips on one fridge?
Think of your fridge like a mini‑gallery. Start with a “anchor” strip at eye level – maybe a family vacation – then add complementary strips in a grid or a loose row, leaving a half‑inch gap so each one can breathe. Rotate them every few weeks; swapping a birthday strip for a recent pet photo not only freshens the look but also spreads wear evenly across the magnets.
Can I personalize the borders or add text to my photo strip magnets?
Absolutely. Most custom‑print services let you choose a thin border color, add a subtle pattern, or tack a short caption (like “Emma’s 10th”) on the bottom panel. Keep the text under 12 characters so it doesn’t crowd the image. A consistent border across a series of strips makes the whole display feel cohesive, and a tiny label helps you remember the occasion at a glance.
How do I clean and maintain photo strip magnets without damaging them?
Cleaning is easy: a damp microfiber cloth wipes away fingerprints and splatters. Avoid abrasive scrubbers or strong solvents – a drop of mild dish soap mixed with water works fine if the magnet is especially sticky. After you wipe, dry it with a soft cloth. If you notice any edge lifting, a quick press with a clean fingertip or a light roll of a credit card will flatten it back into place.
Conclusion
So, after walking through everything from picking the perfect size to keeping your magnets looking fresh, you’re probably wondering if it’s really worth the extra effort.
Honestly, the answer is a resounding yes. A photo strip magnet turns a fleeting snapshot into a tiny piece of everyday art that pops up every time you reach for a snack or open a locker.
Think about how often you glance at your fridge. Each glance becomes a mini‑story moment – a birthday laugh, a beach sunrise, a goofy pet pose – without any extra space or frames.
And because the magnets are interchangeable, you can swap them as often as you change your mood. That flexibility means you’ll never feel stuck with “the same old décor.”
Here’s a quick checklist to keep your magnetic gallery thriving:
- Pick a size that leaves a half‑inch breathing room on your surface.
- Use a simple border and keep any caption under 12 characters.
- Wipe with a damp microfiber cloth and avoid harsh chemicals.
- Rotate strips every few weeks to spread wear evenly.
Now’s the perfect time to pull out those favorite photo strips, upload them to a custom‑print service, and let the magnets do the talking. Your kitchen, office, or shop will thank you for the personal touch.
Ready to start? Grab a handful of memories, turn them into photo strip magnets, and watch how a tiny magnet can make a big smile appear every day.


