

Ever glance at your fridge and feel that tug of nostalgia, like the kitchen suddenly becomes a gallery of moments?
You’re not alone—most of us collect snapshots on phones, yet we rarely find a simple way to turn those digital memories into something you can touch.
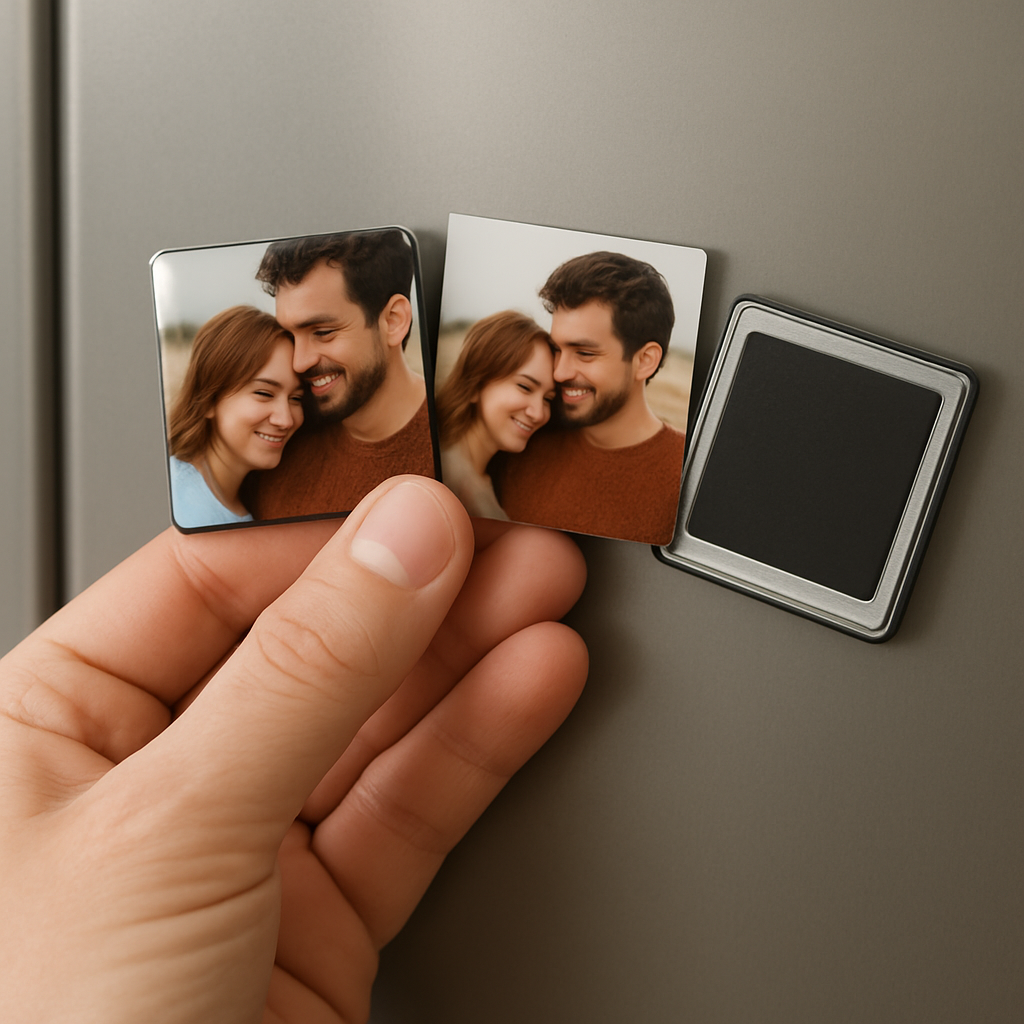
That’s where small photo magnets slide in, literally. They’re pocket‑sized, and stick to any metal surface without a drill.
Imagine a weekend road trip, a goofy selfie with friends, or a snapshot of your new pup—all tucked onto a 2‑inch magnet that brightens your fridge, locker, or office board.
Because they’re small, you can mix dozens without clutter; it’s like a rotating collage you can rearrange whenever the mood strikes.
And the best part? No special printer or fancy software needed. A simple online tool lets you upload, crop, pick a finish, and the magnet arrives ready to stick.
So why do small photo magnets feel like a tiny miracle for home décor? First, they turn fleeting digital moments into tangible reminders you actually see every day.
Second, they’re perfect for gifting—slide a favorite picture onto a magnet and you have a personalized present that fits in a pocket and costs far less than a framed print.
Finally, they’re surprisingly durable. The magnet backing protects the image from scratches, and a UV‑coated surface keeps colors vibrant even after months on a sunny windowsill.
Ready to try? Grab a handful of favorite photos, think about the spots you see daily, and imagine a burst of color lifting your routine.
We’ll show you how to pick the right size, finish, and creative arrangements, so you can turn digital memories into everyday magic.
Stick around, and you’ll see how a few small photo magnets can become the unsung heroes of your home’s storytelling.
TL;DR
Small photo magnets turn your favorite digital snapshots into instant, stick‑on décor that brightens fridges, lockers, or office boards without any fuss.
Just upload a picture, pick a size, and let Loveonmagnets deliver a vibrant, UV‑coated magnet ready to stick, so you can enjoy daily reminders of memories you love.
Step 1: Choose the Right Materials for Small Photo Magnets
Ever stood in the aisle, staring at a rack of blank magnet sheets and wondered which one will actually make your memories pop? It’s easy to feel stuck, but the good news is you don’t need a chemistry degree to pick the right stuff. Let’s break it down together, step by step.
Magnet strength matters
The core of every small photo magnet is the magnetic material itself. Most budget‑friendly options use ferrite, which is decent for a fridge door but can wobble on thicker metal. If you want a magnet that hugs the surface like a friend who never lets go, look for a neodymium blend—even in tiny 2‑inch formats, it adds a subtle extra pull without adding bulk.
So, how do you know which blend you’re getting? Check the product description for “strong hold” or “premium magnetic layer.” That little phrase is usually the giveaway.
Choosing the photo substrate
Next up is the surface that actually shows your picture. Paper is the classic choice – it’s cheap, easy to print, and works fine for casual décor. But if you’re planning to stick your magnets on a sunny kitchen window, consider a polyester‑coated sheet. It resists moisture and won’t curl after a few weeks of humidity.
Vinyl is another solid option if you love a glossy, almost sticker‑like feel. It’s slightly thicker, so it adds a tiny bit of weight, which can actually improve adhesion on smoother surfaces. And if you’re into a matte, art‑gallery vibe, matte‑coated paper will mute glare while still keeping colors vivid.
Finishes that protect and wow
Once you’ve chosen your substrate, think about the final coating. A UV‑protected gloss will make colors pop and guard against fading from kitchen light. Matte UV coating does the same but with a softer look. If you want an extra layer of durability, a clear epoxy seal adds scratch resistance – perfect for busy households with kids.
Here’s a quick cheat sheet: gloss for bright, eye‑catching scenes; matte for subtle, text‑heavy images; UV‑coat for any spot that gets a lot of sun.
Size and shape considerations
Small photo magnets usually come in 2‑inch squares or circles. The shape you pick can influence how the image is framed. Squares give you a classic portrait feel, while circles add a playful touch that works great for candid shots.
Make sure the dimensions you choose match the resolution of your photo. A 300 dpi image printed at 2 × 2 inches will stay sharp, whereas a low‑resolution selfie will look pixelated.
Putting it all together
Now that you know the building blocks, it’s time to mix and match. Start with a strong magnetic core, pick a substrate that suits your environment, and finish with a coating that protects the colors you love. If you need a deeper dive, the mini photo magnet guide walks you through each decision with visual examples.
Actionable tip: before you hit “order,” grab a single sample of each substrate (paper, vinyl, polyester) and stick it on the exact surface you plan to use. See how it feels, how the magnet holds, and whether the finish matches your style. That quick test saves you a lot of guesswork.
With the right materials in hand, you’ll watch ordinary snapshots transform into tiny, magnetic moments that brighten every glance at your fridge or locker. Ready to start? Grab your favorite photos, decide on the finish you love, and let the magnets do the rest.
Step 2: Prepare and Print Your Photos
Now that you’ve picked the perfect material combo, it’s time to get your images ready to become tiny fridge celebrities.
Choose Your Photos
Start by pulling the pictures that actually make you smile – a sunrise from that beach trip, your dog’s goofy grin, or the goofy selfie from last weekend. If a photo feels “meh,” it probably will look meh on a magnet too.
Do you have a mountain of screenshots? Trim the pile down to the ones you’ll see every day. Less is more when you’re working with a 2‑inch canvas.
Edit for Magnet Size
Open your favorite editing app and crop to a square, because most small photo magnets are 2 × 2 inches. Keep the subject centered; you don’t want the edge of a face cut off when the magnet sticks to a fridge.
Adjust brightness and contrast just enough so the image pops under kitchen lighting. A quick “increase saturation by 10 %” often makes colors survive the glare of a stainless‑steel surface.
So, how do you know if the edit is good enough?
Print with the Right Settings
Laser‑jet printers are the go‑to for small photo magnets. The toner sits on top of the paper, which means it won’t bleed when you later coat it with a sealant.
Set the print quality to “high” or “photo” mode, and choose a paper type that matches your finish – glossy photo paper for a glossy look, matte cardstock for a glare‑free vibe.
If you only have an ink‑jet, print on glossy paper and follow it quickly with a quick‑dry sealer; otherwise, you’ll end up with smudges.
Does the printer matter for durability?
Let the Ink Dry
Give the printed sheet at least 5‑10 minutes to dry completely. Rushing this step is a common cause of fuzzy magnets that look like they’ve been through a dishwasher.
Touch the surface lightly; if it feels tacky, wait a bit longer. Patience here saves you a re‑print later.
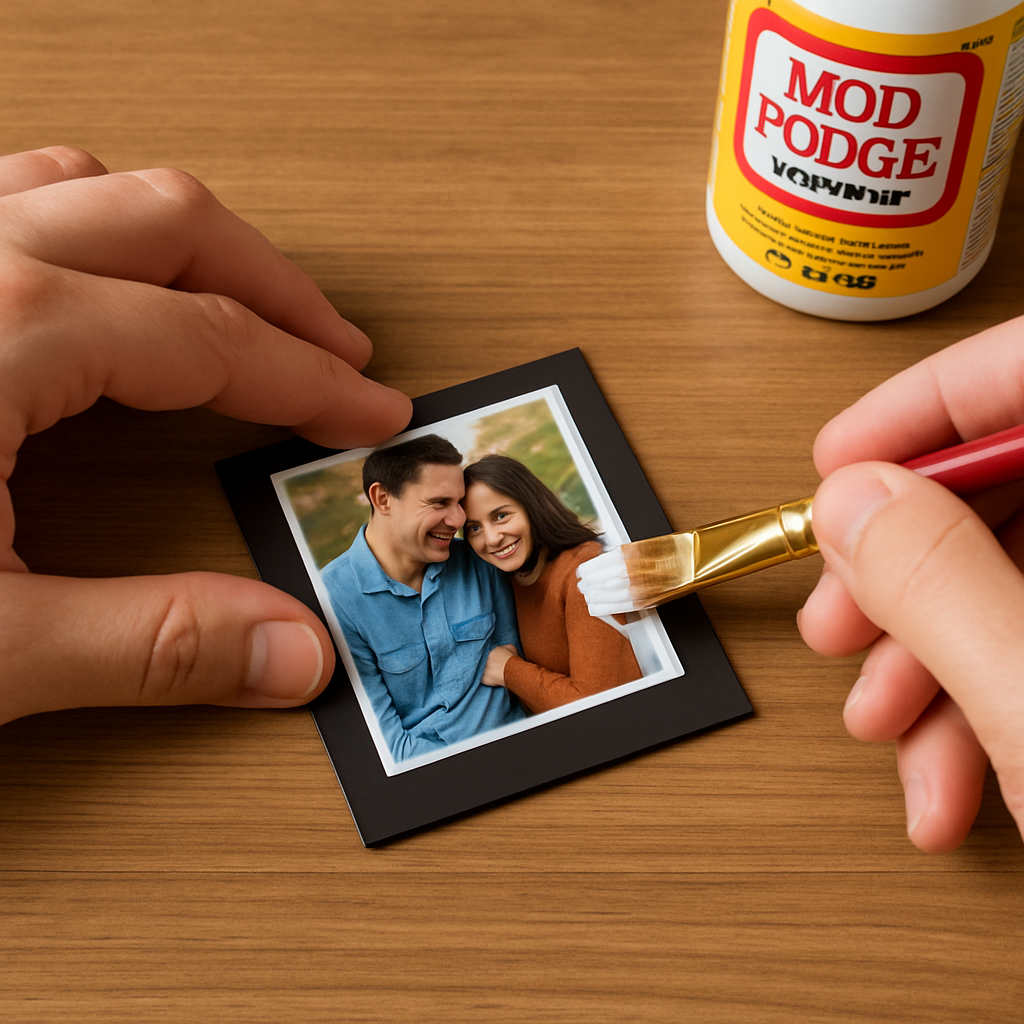
Seal the Image
A single brush‑on coat of glossy Mod Podge or a spray acrylic sealer creates a water‑resistant shield. Apply a thin, even layer – you don’t need a thick gloss that makes the magnet bulky.
Let the seal dry for about 20 minutes. If you’re in a hurry, a hair‑dryer on low heat can speed things up, but keep the distance far enough to avoid bubbles.
What about UV exposure?
UV Protection (Optional)
If the magnet will live in a sunny spot, consider a UV‑coated paper or add a second matte spray on top of the glossy seal. This double layer keeps colors from fading after months of kitchen heat.
Even a tiny UV‑coated sheet makes a noticeable difference on a fridge that basks in morning light.
Attach the Magnet Backing
Once the coating is fully set, peel off the protective film from your soft magnet sheet and align it carefully with the printed side. Press firmly from the center outwards to avoid air pockets.
If you want extra pull, stick a thin neodymium disc in the middle before sealing the back. The disc adds strength without adding visible bulk.
Finally, give the finished magnet a quick tug on a metal surface. If it holds without wobbling, you’re good to go.
Ready to Scale Up?
Now you’ve got a handful of perfect small photo magnets ready to brighten any metal surface. When you’re ready to crank out a batch, check out our step‑by‑step DIY guide for tips on batch printing, cutting, and packaging.
Step 3: Cut and Shape Your Magnets – Comparison of Cutting Tools
Now that your images are sealed and the magnet backing is ready, the real fun begins – slicing those little works of art into perfect 2‑inch squares.
We all know the frustration of a jagged edge that makes the magnet look cheap. The good news? A handful of everyday tools can give you clean, professional cuts without breaking the bank.
Scissors – The Quick‑Fix
If you’re in a rush or only need a few magnets, a sharp pair of office scissors might do the trick. They’re cheap, easy to grip, and you can see the cut line as you go.
But beware: scissors tend to leave a tiny ragged border, especially on the thin magnet sheet. For a truly smooth edge, you’ll likely need a second pass with a finer tool.
Craft Knife (X‑Acto) – Precision on a Budget
A craft knife gives you that razor‑thin line you see in hobby shops. Pair it with a metal ruler and you’ve got a makeshift guillotine that slices straight every time.
Tip: use a self‑healing cutting mat so the blade doesn’t dull too fast, and replace the blade after a few cuts to keep the edge crisp.
Rotary Cutter – The Kitchen‑Counter Favorite
Rotary cutters are a step up in speed. Glide the wheel along a straight edge and you’ll cut through paper, cardstock, and even the soft magnet sheet in one smooth motion.
The main downside is the initial cost and the need for a cutting mat, but once you have them the tool virtually eliminates wobble.
Die‑Cut Machines (e.g., Cricut, Silhouette) – Hands‑Free Consistency
If you’re planning a batch of 20 + magnets, a desktop die‑cut machine can automate the process. Load your printed sheet, set the material profile to “magnet,” and let the machine do the heavy lifting.
These machines excel at repeatability, but they require a design file and a bit of software learning curve. Still, the time saved on cutting alone often justifies the price.
Laser Cutter – Pro‑Level Accuracy
For the ultimate clean edge, a laser cutter slices with a focused beam that melts the material edge, leaving no frayed fibers. It’s perfect for intricate shapes beyond simple squares.
The catch? Access to a laser cutter usually means a maker space or a pricey home unit, and you’ll need to set the power and speed correctly to avoid scorching the magnet.
| Tool | Precision | Ease of Use | Cost | Best For |
|---|---|---|---|---|
| Scissors | Low | Very Easy | Under $5 | One‑off or tiny batches |
| Craft Knife | High | Easy with ruler | $10‑$15 | Small batches, straight cuts |
| Rotary Cutter | High | Easy | $20‑$30 | Medium batches, consistent edges |
| Die‑Cut Machine | Very High | Hands‑free | $200‑$300 | Large batches, custom shapes |
| Laser Cutter | Maximum | Technical | Varies (membership) | Professional finish, complex designs |
So, which tool should you reach for right now? If you’re just testing the waters, grab a craft knife and a ruler – it’s cheap, precise, and you’ll quickly see the difference over scissors.
For anyone serious about turning small photo magnets into a mini‑business, investing in a rotary cutter or a die‑cut machine pays off in speed and consistency. And if you have access to a local makerspace, popping a design through a laser cutter can give you that polished, boutique look without the hand‑cut hassle.
Remember to always cut on a stable surface, keep your fingers clear of the blade, and discard the waste pieces promptly so they don’t jam your next cut.
Ready to see the tools in action? Our complete guide to mini photo magnets walks you through setting up each cutter and offers downloadable templates to speed up your workflow.
Give one of these methods a try, and you’ll notice how clean edges instantly make your small photo magnets look more professional – and how much more fun the process becomes when the cutting feels effortless.
Step 4: Assemble and Seal the Magnets
Now that your photos are printed, coated, and your magnet sheets are ready, it’s time to bring everything together. This is the moment where a sloppy press can ruin all that careful work, so let’s walk through a reliable, low‑stress assembly process.
1. Align the printed face with the magnet core
Lay the soft magnet sheet on a clean, flat surface – a piece of wax paper works great because it prevents sticking. Peel off the protective backing from the sheet, then gently lower your sealed photo onto the adhesive side. You’ll notice a faint air‑bubble pattern if the alignment is off; that’s your cue to lift and reposition.
Use a ruler or the edge of a credit card to smooth the image from the centre outwards. A light press is enough; you don’t need to force it. Think of it like placing a sticker on a laptop – you want it to adhere evenly, not crumple.
Does the photo line up exactly where you want it? If not, a quick peel and retry is totally fine – the magnet sheet is forgiving enough to handle a few attempts.
2. Add a protective seal over the front
Even though you already applied a Mod Podge or acrylic spray, a thin top‑coat after the magnet is glued adds extra water resistance. Grab a clean foam brush, dip it lightly into a fresh batch of glossy Mod Podge, and sweep a smooth layer over the whole surface. Keep the brush strokes light; you’re aiming for a veil, not a puddle.
Watch for drips at the edges – a quick swipe with the brush tip will smooth them out. The seal also helps hide any tiny gaps where the photo meets the magnet, giving your small photo magnets a professional “no‑edge‑visible” look.
3. Let everything cure properly
Patience really does pay off here. Set the assembled magnets aside in a dust‑free spot and let the seal dry for at least 30 minutes. If you’re in a humid kitchen, give them an hour; the extra time prevents tackiness later.
While you wait, you can prep the next batch, clean your tools, or simply admire the growing collection on your fridge. The scent of drying Mod Podge is oddly satisfying, right?
4. Test adhesion and trim if needed
After the cure, give each magnet a gentle tug on a metal surface. It should hold firmly without wobbling. If a piece feels loose, flip it over and check the backside – a tiny bubble or dust particle might be interfering. A quick press with a fingertip usually re‑establishes contact.
If the edges look a bit uneven after sealing, use a craft knife to trim them while the seal is still slightly tacky. This gives you crisp, clean borders that make the magnet look “just right.”
5. Pro tips for a flawless finish
– Work in a well‑ventilated area; the fumes from acrylic sealers can be strong.
– Keep a small spray bottle of water nearby; a mist can help smooth out brush marks before the seal sets.
– For a matte look, swap the glossy Mod Podge for a matte variant in the final coat – the magnetic pull stays the same, only the shine changes.
And if you’re thinking about scaling up, consider ordering bulk custom photo magnets from Loveonmagnets. They’ll ship you pre‑cut magnet sheets that match your size, so you can skip the cutting step entirely and focus on the creative side.
When you finish this step, you’ll have a set of sturdy, glossy small photo magnets ready to stick on any metal surface – from the fridge door to a metal office locker. The whole process feels a lot like a small craft ritual, and the end result is a tiny piece of memory you can actually touch every day.
Step 5: Creative Design Ideas for Small Photo Magnets
Okay, you’ve got the material, the print, the seal, and the magnet all snug together. Now comes the fun part – turning those tiny squares into something that feels personal, playful, and maybe even a little unexpected.
1. Mix‑and‑match themes
Instead of a straight‑up photo grid, try grouping magnets by vibe. One week you could showcase “Morning Coffee” – a latte art shot, a sunrise, a handwritten to‑do list – all in the same color palette. The idea is to give each cluster a story, so when you glance at the fridge you get a quick narrative bite.
Does it feel a bit chaotic at first? That’s okay. Play with the order, move a magnet here, swap one there, and you’ll see the pattern emerge.
2. Add a pop of texture
Because the magnet is smooth, you can layer a thin strip of washi tape, a dab of fabric scrap, or a tiny vellum overlay on the front before sealing. The texture catches the eye without adding bulk, and it’s a neat way to highlight a favorite photo – think of it as a miniature frame you can’t break.
Pro tip: use a matte‑finish seal over textured elements so the tape doesn’t get sticky later.
3. Play with shape
Square magnets are classic, but you’re not limited to that. Cut the magnet sheet into circles, hearts, or even puzzle‑piece shapes (a simple X‑Acto blade does the trick). A round magnet with a portrait feels like a mini‑badge, while a heart works great for anniversaries or Valentine’s gifts.
When you experiment, keep the cut size close to 2 inches so the image still fills the space – a little border of the backing can act like a built‑in frame.
4. Use transparent overlays for a “double‑exposure” effect
Print a faint silhouette of a shape – a leaf, a skyline, a paw print – on clear acetate. Stick that over your photo before the final seal. The result is a subtle ghost image that adds depth, perfect for nature lovers or pet parents.
If you’re not comfortable with acetate, a sheet of clear contact paper works just as well.
5. Incorporate handwritten notes
Grab a fine‑point marker and write a one‑line caption, a date, or a short quote on the back of the printed photo before sealing. When the magnet flips, the text shows up like a secret message. It’s a sweet way to add context without crowding the front image.
Try a tiny font – think “post‑it note” size – so it stays legible but doesn’t dominate the visual.
6. Seasonal mini‑sets
Design a set of four magnets that you can rotate through the year: a snowflake for winter, a blooming flower for spring, a sun‑hat for summer, and a pumpkin for fall. Swap them out as the months change, and you’ll have a fresh look without buying new magnets each time.
Because the magnets are small, you can store the off‑season ones in a drawer and pull them out whenever the mood strikes.
7. Gift‑ready bundles
When you’re making magnets for friends or clients, bundle three‑to‑five pieces in a tiny clear bag with a ribbon. Add a handwritten thank‑you card that explains the design inspiration – maybe “Your favorite hiking trail” or “Our office mascot.” It feels like a curated mini‑gift rather than a random trinket.
This approach works especially well for small‑business owners who want a low‑cost, memorable giveaway.
8. Quick inspiration source
Need more ideas on the fly? Check out the complete guide to photo magnet uses and styles for a gallery of real‑world applications that can spark your next design.
Take a moment, grab a magnet, and start mixing these tricks. The goal isn’t perfection; it’s to create a little visual diary you love to look at every day. Once you’ve played around, you’ll notice how a simple design tweak can turn a plain snapshot into a conversation starter on your fridge.
Step 6: Caring for and Maintaining Small Photo Magnets
So you’ve spent a little time picking photos, printing, sealing, and sticking them on the fridge. Now comes the part most people skip: keeping those tiny treasures looking fresh for months.
Keep the surface clean, but gentle
Dust loves to settle on glossy finishes, especially in a kitchen that’s constantly opening and closing. A soft microfiber cloth does the trick – no paper towels or abrasive sponges. Wipe in one direction, not in circles, to avoid streaks. If you notice a fingerprint, a dab of diluted dish soap (a few drops in a cup of water) followed by a quick dry with the cloth will erase it without harming the seal.
Avoid harsh sunlight
A quick rule of thumb: if the magnet sits on a window that gets more than three hours of midday light, consider rotating it to a shaded spot once a week. You’ll be surprised how a simple flip can extend the vibrancy for another season.
Does this mean you have to hide your favorite photo forever? Not at all. A small piece of decorative washi tape on the edge can act like a tiny “sunshade” while still letting the image peek out.
Mind the kitchen steam
Cooking fumes love to cling to metal surfaces. After a big pot of pasta, give your fridge a quick wipe‑down before the magnets get a chance to soak up moisture. If you notice a faint misty film, a light spray of white vinegar diluted 1:4 can cut through the residue – just remember to wipe it off right away.
Storage tricks for off‑season magnets
When you rotate seasonal sets (think pumpkins for fall, sun‑hats for summer), store the ones you’re not using in a flat cardboard box with a zip‑lock bag. Slip a thin sheet of acid‑free paper between each magnet; this prevents them from scratching each other.
And because they’re small, you can even tuck a handful in a kitchen drawer behind the cutlery. Just make sure the drawer isn’t a magnet‑heavy zone, or the magnets might cling together and lose their flat shape.
Handling the magnetic side
The back of the magnet is the workhorse – it’s what keeps everything in place. If you ever need to re‑position a magnet, pull it off slowly, letting the adhesive release rather than yanking it. A quick tap with a fingernail can start the lift; then slide it off. This reduces the chance of the backing peeling or the image cracking.
Should a magnet lose its pull over time, a tiny replacement neodymium disc (about 5 mm in diameter) can be glued to the center. It’s a cheap fix that brings the grip back to life without buying a whole new set.
Cleaning a stubborn stain
Sometimes a splash of sauce or a dab of paint sneaks onto the front. Because the seal is water‑resistant, you can gently rub the spot with a cotton swab dipped in isopropyl alcohol. Test a hidden corner first – if the coating stays smooth, go ahead and clean the rest.
For stubborn ink marks, a light dab of nail polish remover (acetone) works, but limit it to the spot and rinse quickly with water. Too much solvent can eat through the Mod Podge layer.
Regular check‑up checklist
- Wipe the front with a microfiber cloth weekly.
- Inspect the back for any loosened edges after moving the magnet.
- Rotate magnets that sit in direct sun every 7‑10 days.
- Store off‑season pieces flat and protected.
Following this quick routine means you’ll keep enjoying those little memory bursts without having to re‑print every few months.
Need a deeper dive?
If you’re curious about picking the perfect size and finish for long‑lasting magnets, our practical guide on choosing and creating 3×3 photo magnets walks you through material options that resist fading and wear.
Now you’ve got the low‑maintenance game plan. Grab a cloth, give your fridge a quick glance, and enjoy the smile that pops up every time you see that tiny photo.
Conclusion
We've taken you from picking the perfect snap to sealing, and caring for your tiny masterpieces.
At this point you know that a good print, a thin coat of Mod Podge, and a solid neodymium disc are the trio that keeps a small photo magnet vibrant and stubbornly attached.
So, what does all this mean for your everyday kitchen?
It means you can turn a handful of memories into a rotating gallery that survives steam, fingerprints, and the occasional toddler tug.
Does the idea of swapping out a summer beach shot for a holiday cookie picture sound fun?
Because you’ve built a simple maintenance routine—wipe, rotate, re‑seal when edges lift—the magnets stay fresh for months without you breaking a sweat.
A quick checklist at the back of the fridge (or on your phone) can remind you to dust and test the pull every few weeks.
When you’re ready to add more, the same process works for new photos, kids' doodles, or even mini business cards—just repeat the steps.
If you’re looking for ready‑made options or want premium custom prints, Loveonmagnets has everything you need to get started right now.
Enjoy the smile each time you open the door, and let your small photo magnets keep telling your story.
FAQ
How durable are small photo magnets in a busy kitchen?
Small photo magnets hold up surprisingly well in a kitchen that’s constantly buzzing. The combination of a thin rubber core and a tiny neodymium disc gives enough pull to stay stuck even when you tap the door or steam fogs the surface.
As long as you’ve sealed the front with a clear acrylic spray, fingerprints and occasional splashes won’t bleed through. Most hobbyists report no loss of adhesion for three‑plus months.
Can I use my phone photos directly for small photo magnets?
You can absolutely use the photos you already have on your phone, but a few tweaks make a big difference. Export the image at its original resolution, turn off heavy compression, and aim for at least 300 dpi.
A quick crop to a 2‑inch square keeps the subject crisp, and printing on glossy or matte photo paper preserves color. The result looks professional even though the source was just a snap.
What kind of sealant works best for protecting the image?
A clear acrylic sealer is the go‑to choice because it dries hard, stays water‑resistant, and doesn’t yellow over time. Spray it in light, even coats from about a foot away, let each layer dry 15‑20 minutes, then add a second coat if you used glossy paper for extra shine.
If you prefer a brush‑on method, Mod Podge works fine, but keep the film thin so the magnet stays flat against the fridge.
How strong should the magnet be for a fridge vs a locker?
For a typical fridge you’ll want a pull strength of around 0.5 kg (about one pound); that’s enough to hold a 2‑inch magnet without sagging but still lets you lift it off without a tug‑of‑war.
Locker doors are often thinner, so a slightly stronger neodymium disc—about 5 mm in diameter—gives a firmer grip. Test the pull by sliding the magnet; if it slides too easily, bump up the disc size.
Is it safe to wash the magnets or clean them with water?
Yes, you can clean small photo magnets with a damp microfiber cloth; the acrylic seal protects the print from water seeping in. Avoid soaking them or putting them in the dishwasher, because prolonged exposure can weaken the glue that holds the magnetic backing.
If a magnet gets a stubborn fingerprint, a quick spray of water‑based screen cleaner followed by a dry wipe restores clarity without harming the image.
How often should I rotate or replace the magnets to keep them looking fresh?
A quick visual check every two to three months keeps your collection looking fresh. Lift each magnet, dust the back with a soft brush, and give the front a gentle wipe.
If the seal looks hazy or the edges are lifting, re‑spray a thin coat of acrylic sealer. Swapping out a seasonal picture at the same time adds variety and gives the magnets a chance to “reset” their magnetic pull.
Where can I buy ready‑made small photo magnets if I’m short on time?
If you’re in a pinch, Loveonmagnets offers ready‑made small photo magnets that you can personalize with your own images in just a few clicks. They handle printing, sealing, and magnet insertion, so you get a finished product that’s ready to stick on the fridge right out of the box.
This is perfect for last‑minute gifts or when you simply want a professional finish without the DIY steps.


